Description
Product Introduction
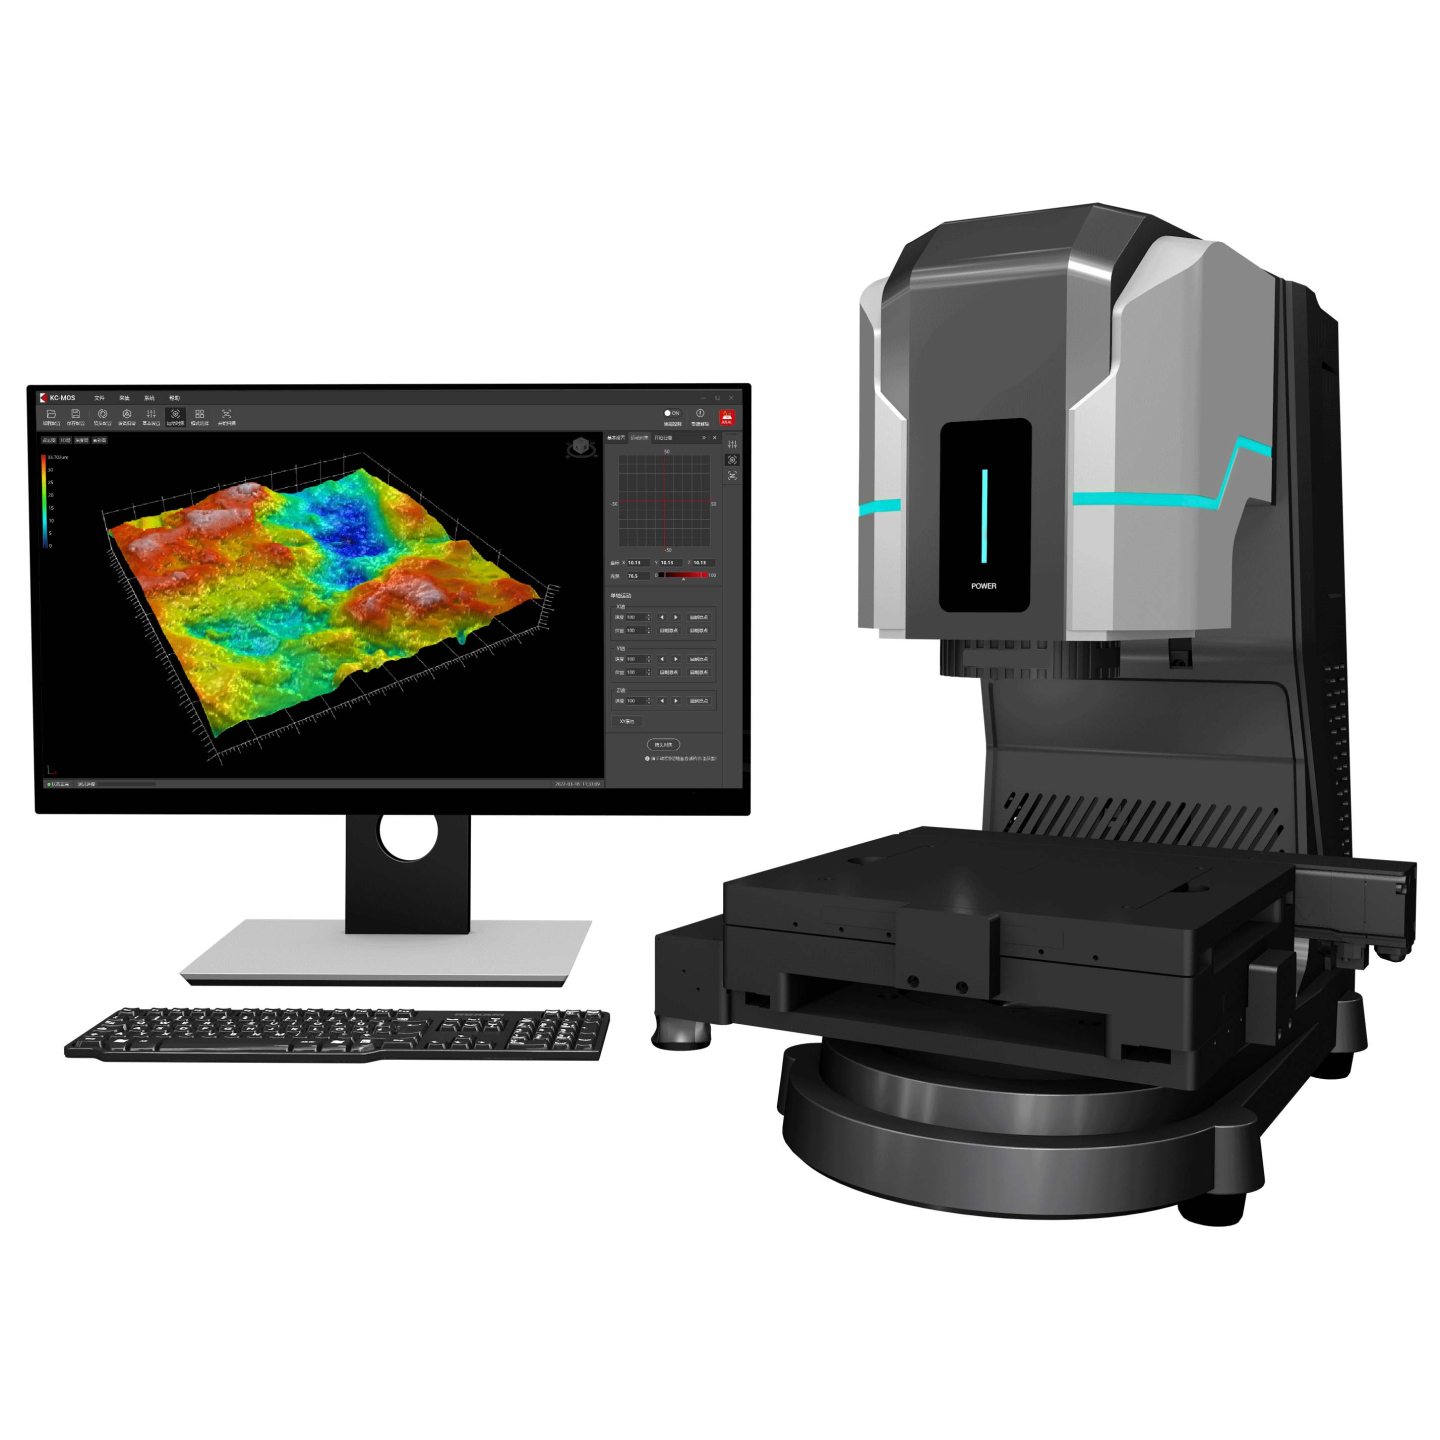
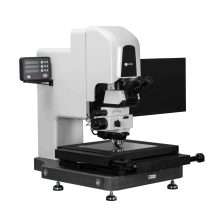
ICOE ICX series laser spectroscopic confocal microscope is a sub-micron detection instrument, which is widely used in surface scanning and measurement of tiny structures and special materials.
The measurement module adopts spectral confocal technology, which can measure the height information of various materials with non-contact and high precision. Combined with the feedback-controlled XY scanning module and 3D imaging algorithm, fine surface microstructures can be obtained.
In the function-rich graphics post-processing module, image processing, 3D analysis, contour analysis, roughness analysis, etc. can also be flexibly performed.
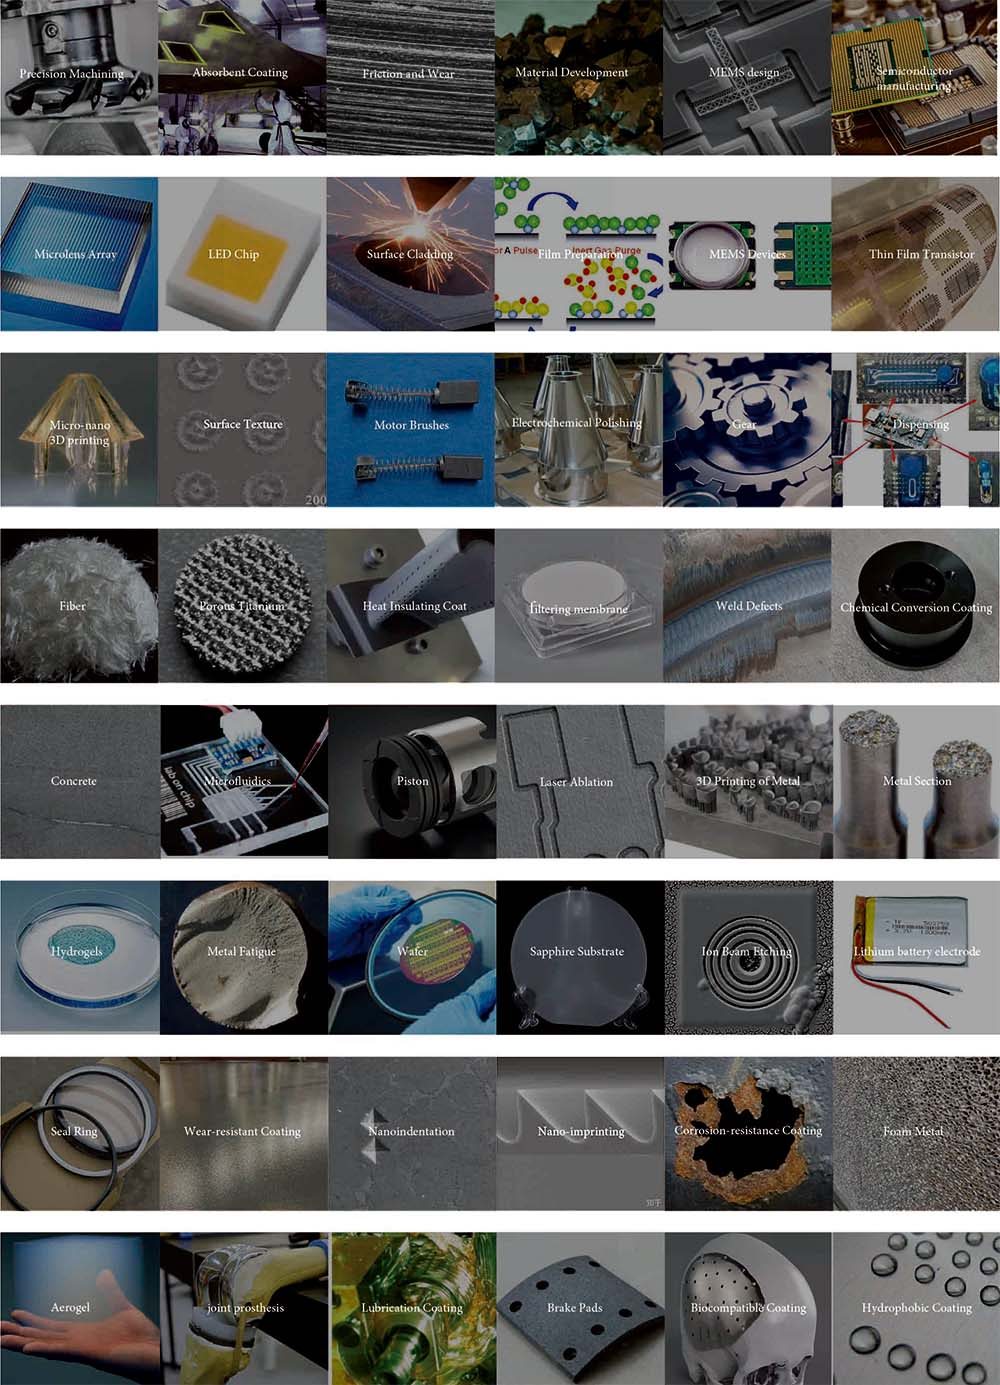
ICOE ICX series laser spectroscopy confocal microscope is used in precision machining, surface treatment, friction and wear, new material development, fuel cell development, MEMS manufacturing, wafer manufacturing, precision optics manufacturing, parts inspection, microfluidic chips, membrane structure, micro Nano-additives and other fields have been unanimously recognized by users.
The product advantages of ICX Series
1. Large scanning range: Measurable sample size from micrometers to meters
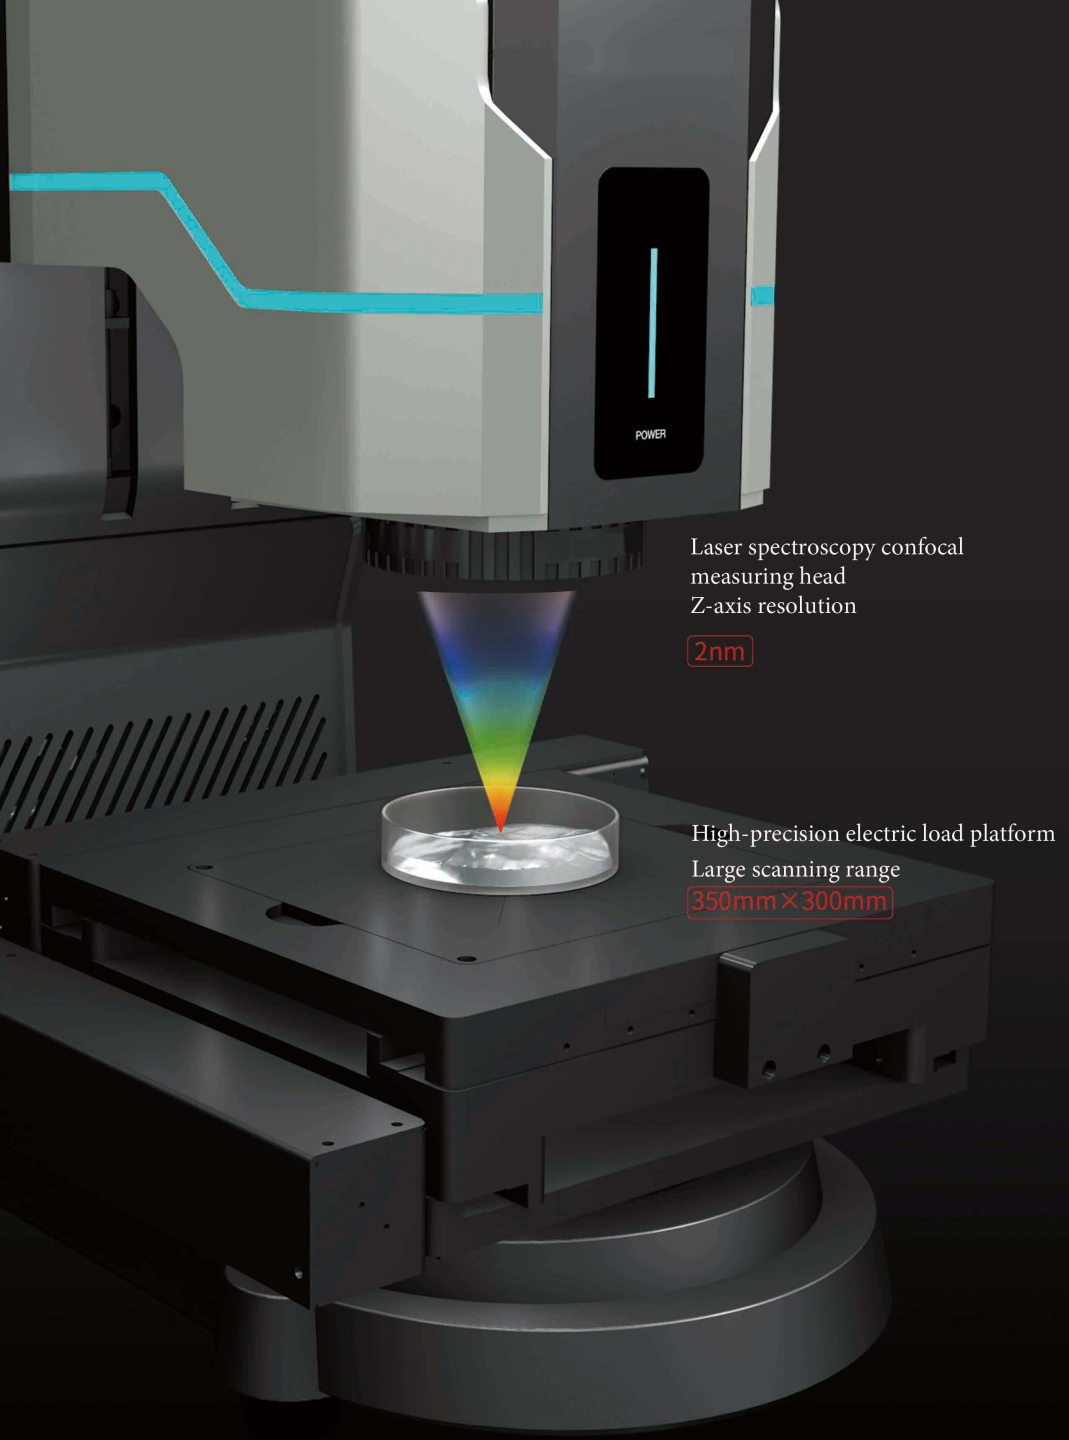
2. Ultra-high measurement accuracy: Z-axis resolution up to 2nm
3. Ultra-fast scanning speed: The movement speed of the high-precision electric stage is 80mm/s, which can quickly perform line profile analysis.
4. Ultra-rich analysis functions: The software comes with image processing and analysis functions, which can perform data analysis work such as contour analysis, plane analysis, volume analysis, roughness analysis, and statistical analysis.
5. Ultra-simple device operation: The sample does not need pre-processing, the software has its own operation and navigation, and the interactive interface is clear and easy to understand. Professional measurement can be performed with a little learning, and analysis reports and statistical reports can be automatically generated according to the template.
6. Superior material adaptability: It can simultaneously measure different types of materials such as transparent and opaque, smooth and rough, low-reflection and high-reflection. For smooth surfaces, the surface slope adaptability is up to ±45°, and for rough surfaces, the surface slope adaptability is better.
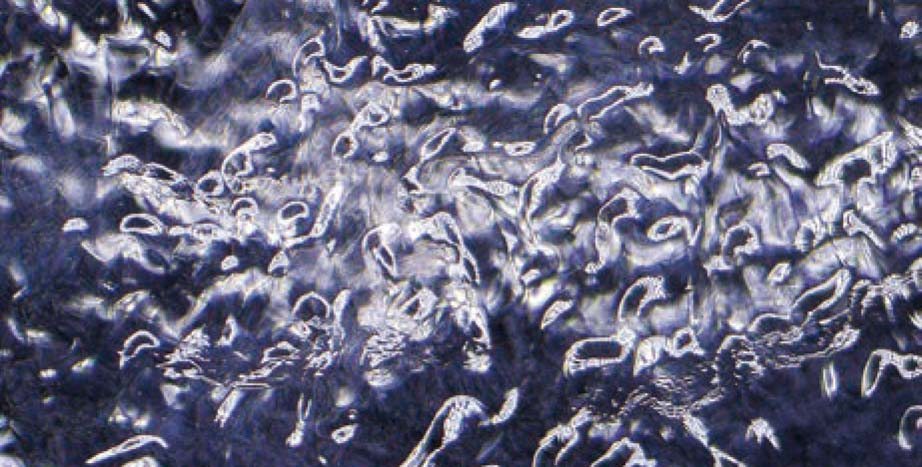
Hydrogel is a system with water as a dispersion medium and a three-dimensional network structure. It is soft in nature, can maintain a certain shape, and has a strong water absorption capacity (water content can be as high as 99%). In addition, the hydrogel also has good biocompatibility and biodegradability.
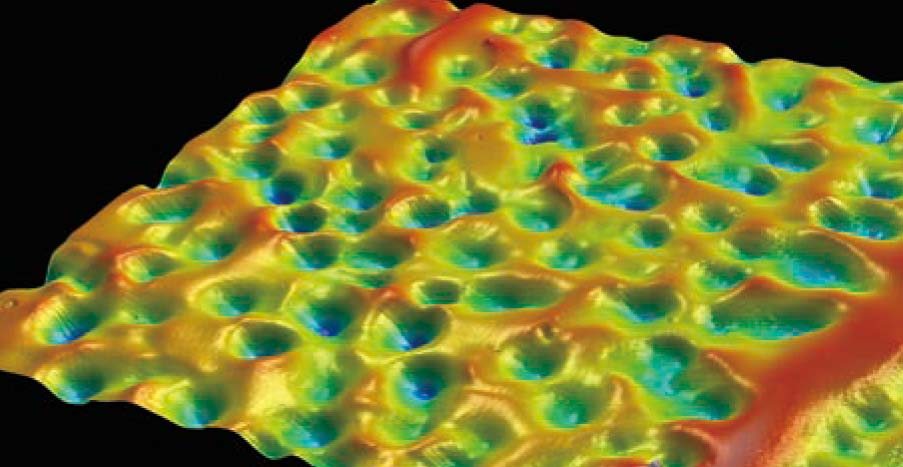
Because hydrogels are usually colorless and transparent, the measurement of the surface microstructure is often impossible by traditional means, and only simple observations can be made. However, the KC series laser spectroscopy confocal microscope can sensitively obtain weak reflections on the surface of hydrogels Light, and then scan imaging to obtain accurate size information.
Application scenarios of ICX Series Product
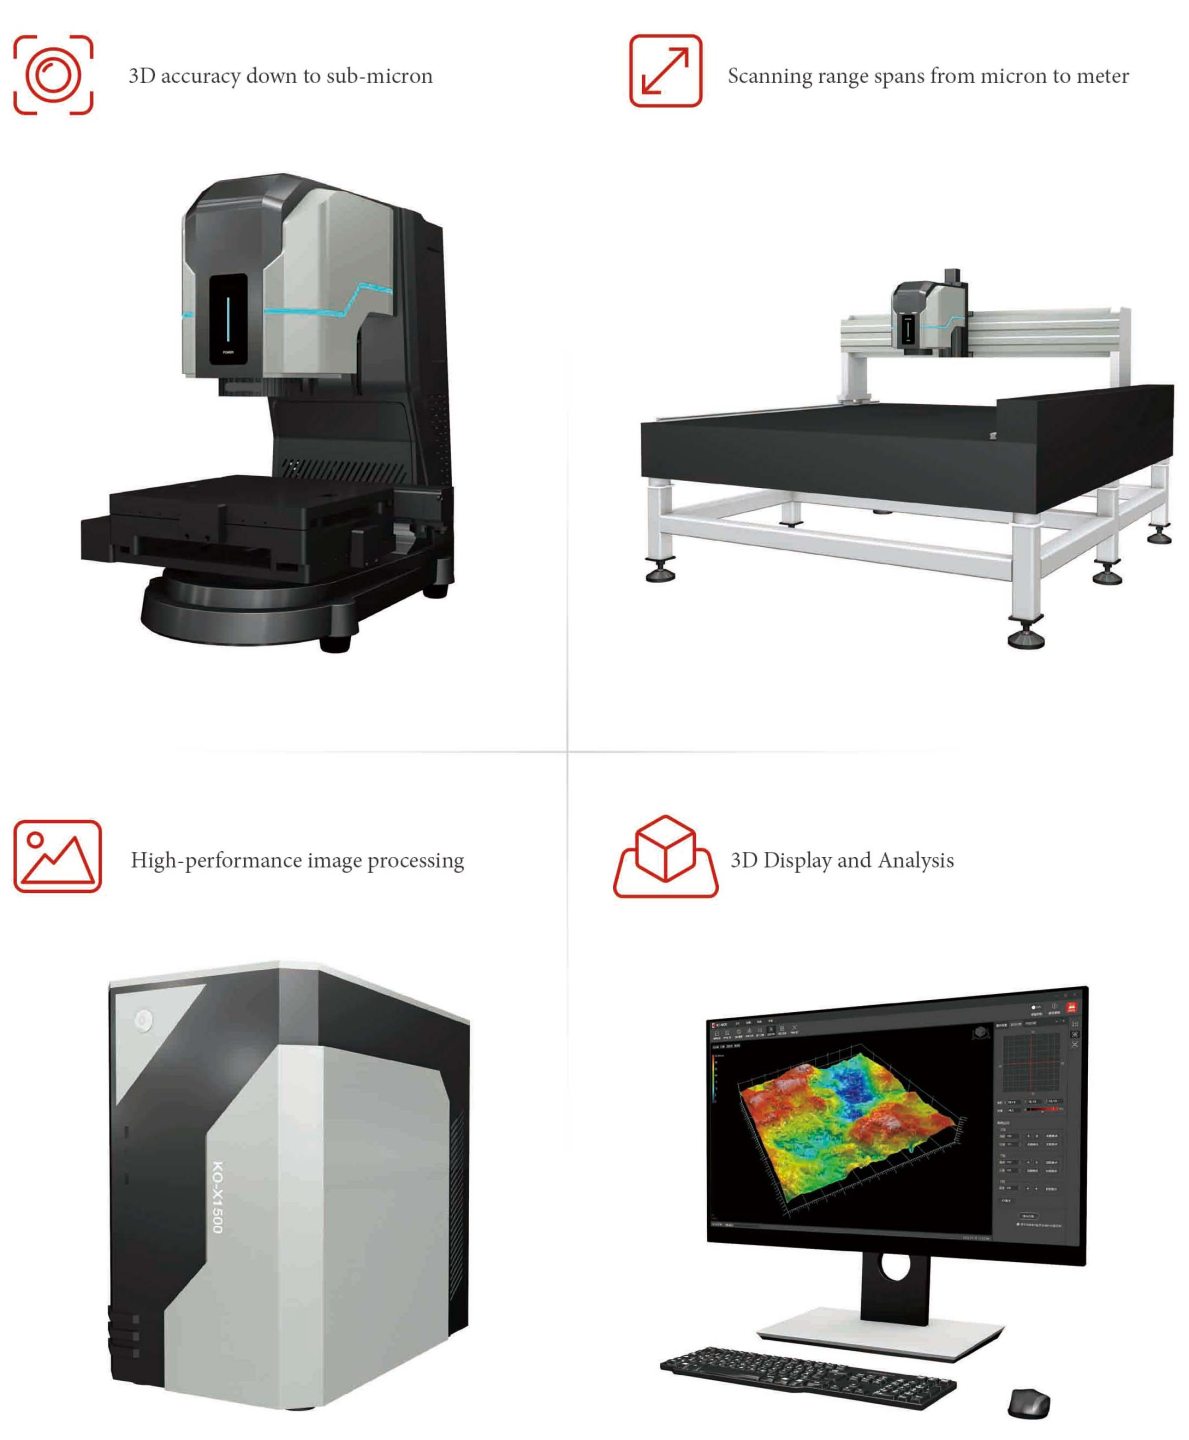
System Configurations
Laser spectroscopy confocal measuring head Z-axis resolution: 2nm
High-precision electric load platform large scanning range: 350mmx300mm
Spectral Confocal Technique
The ICX series measuring head has the functions of projecting, dispersing and receiving polychromatic light. The polychromatic light is dispersed into different wavelengths of light in the Z-axis direction. When the measured object is located at a certain position, there must be a beam of light with a specific wavelength passing through the focusing optical path. As perceived by the element, the wavelength of the received light has a one-to-one correspondence with the displacement of the object, and the distance is obtained by calculating the wavelength of the focal point of the sensed light.
Super fast movement speed: 80mm/s
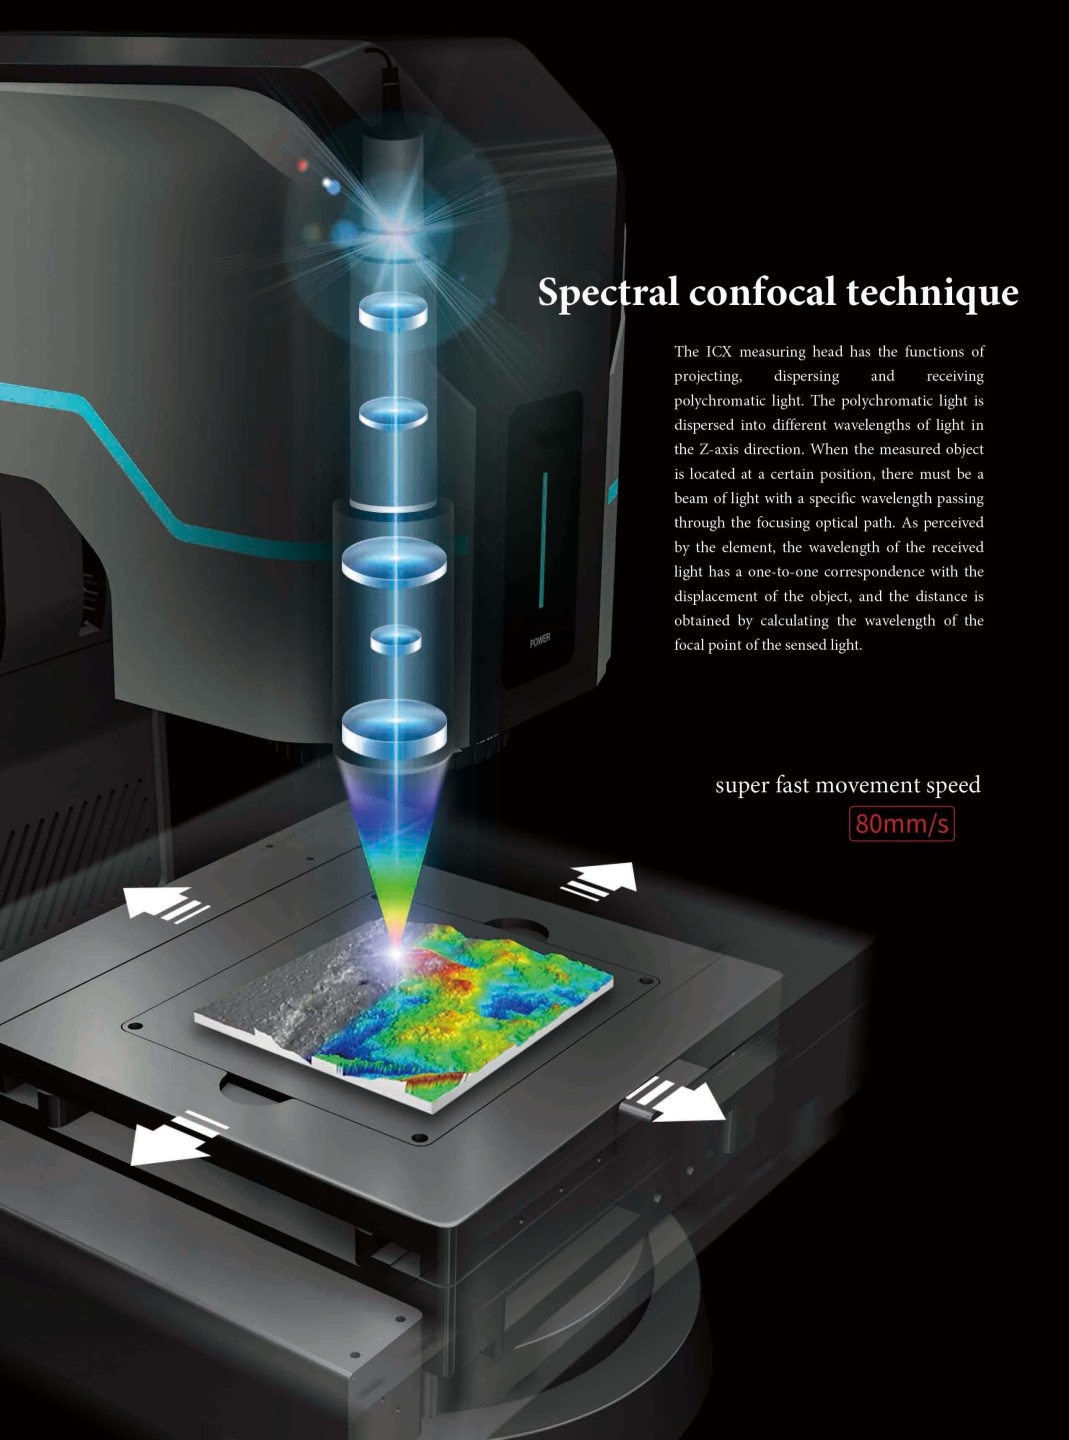
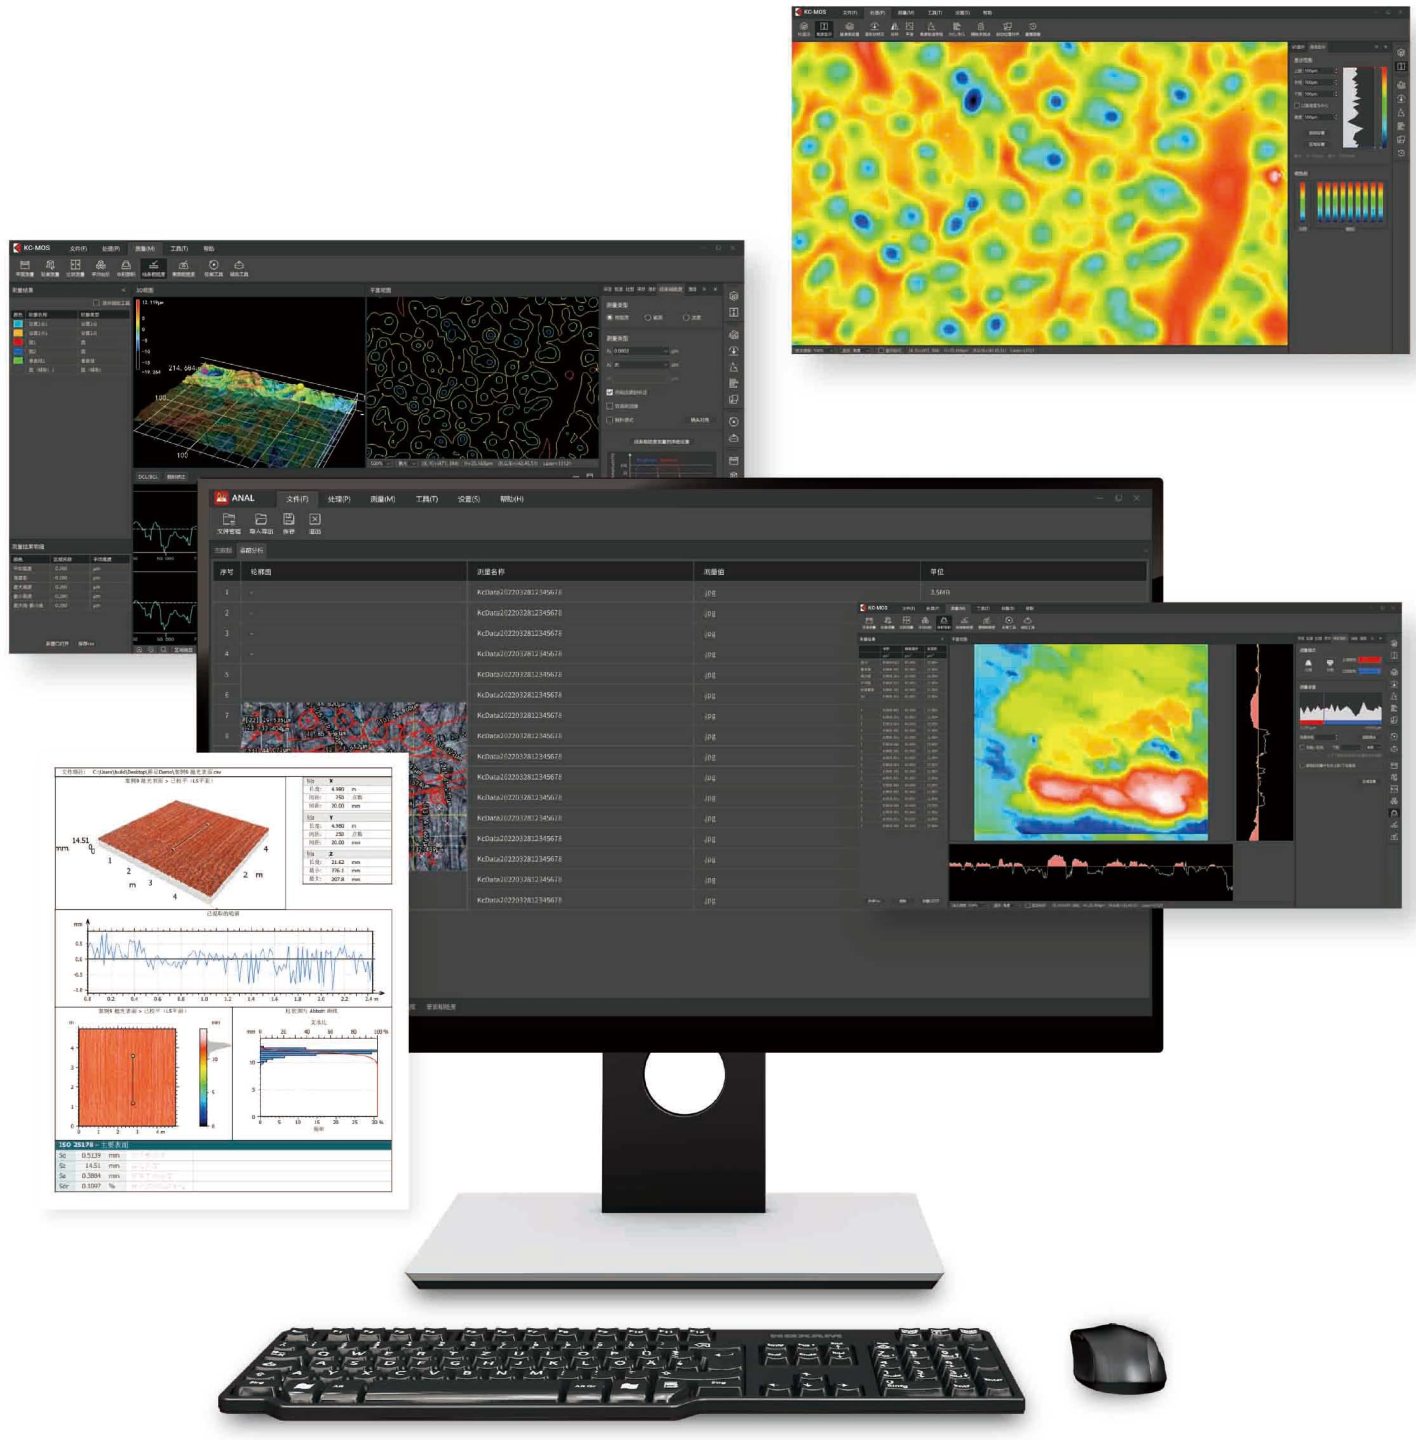
Image Analysis

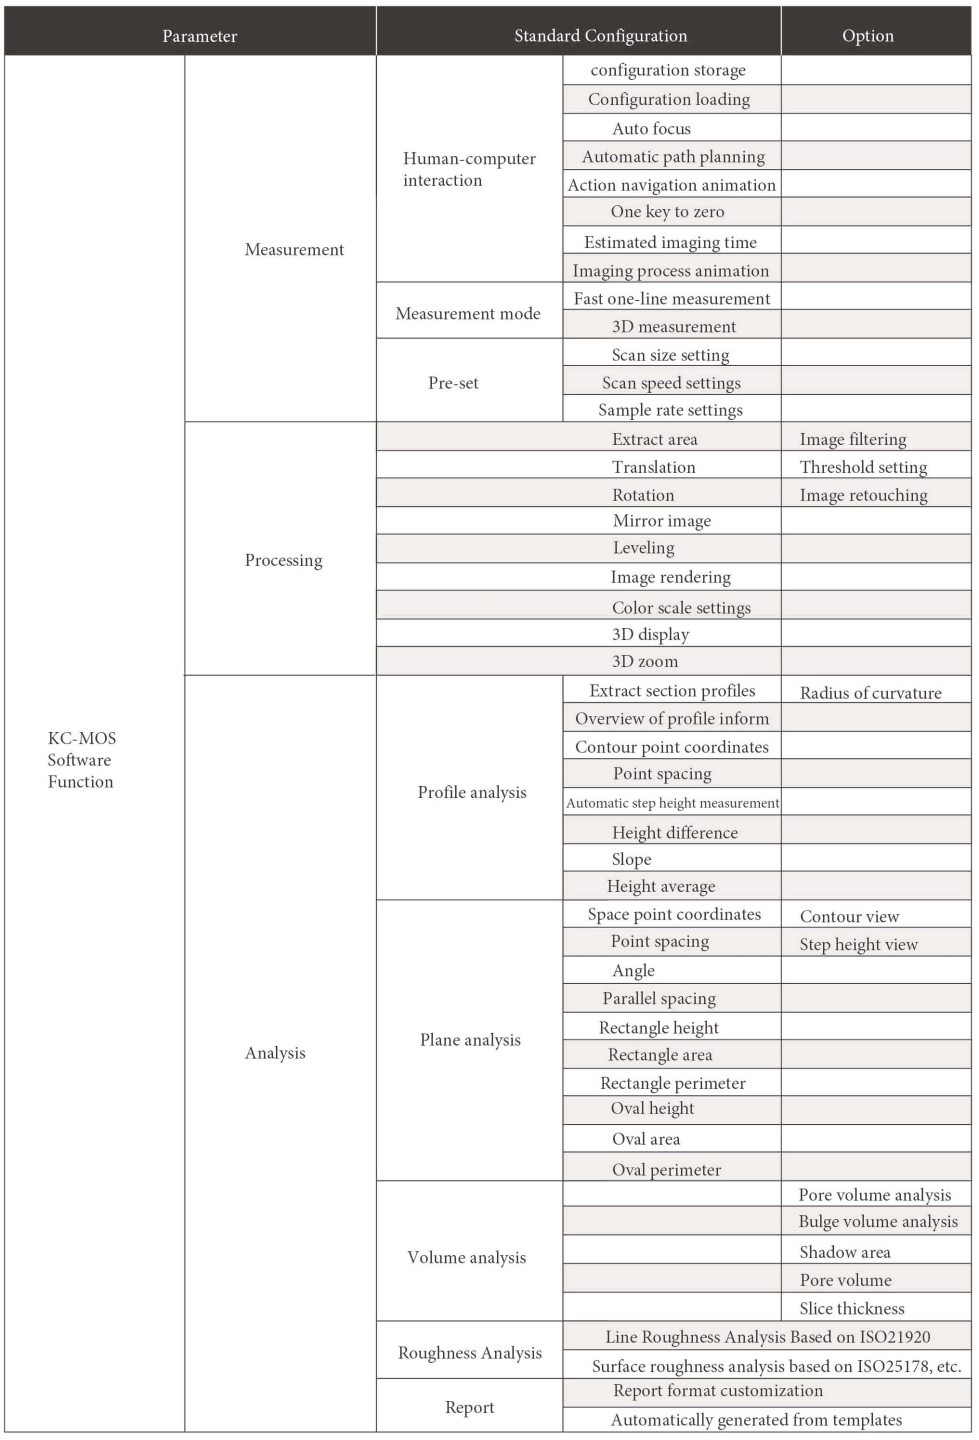
The acquisition and analysis software KC-MOS has powerful image processing and analysis function, such as: 2D contour analysis, 3D volume analysis, roughness analysis, automatic report generation, etc. KC-MOS is equipped with rich processing presets and function navigation animations, which is convenient for beginners to get started. Experienced users can also customize the processing flow and save it as a preset template based on their testing experience.
| Identify weak directional reflections for transparent material measurement
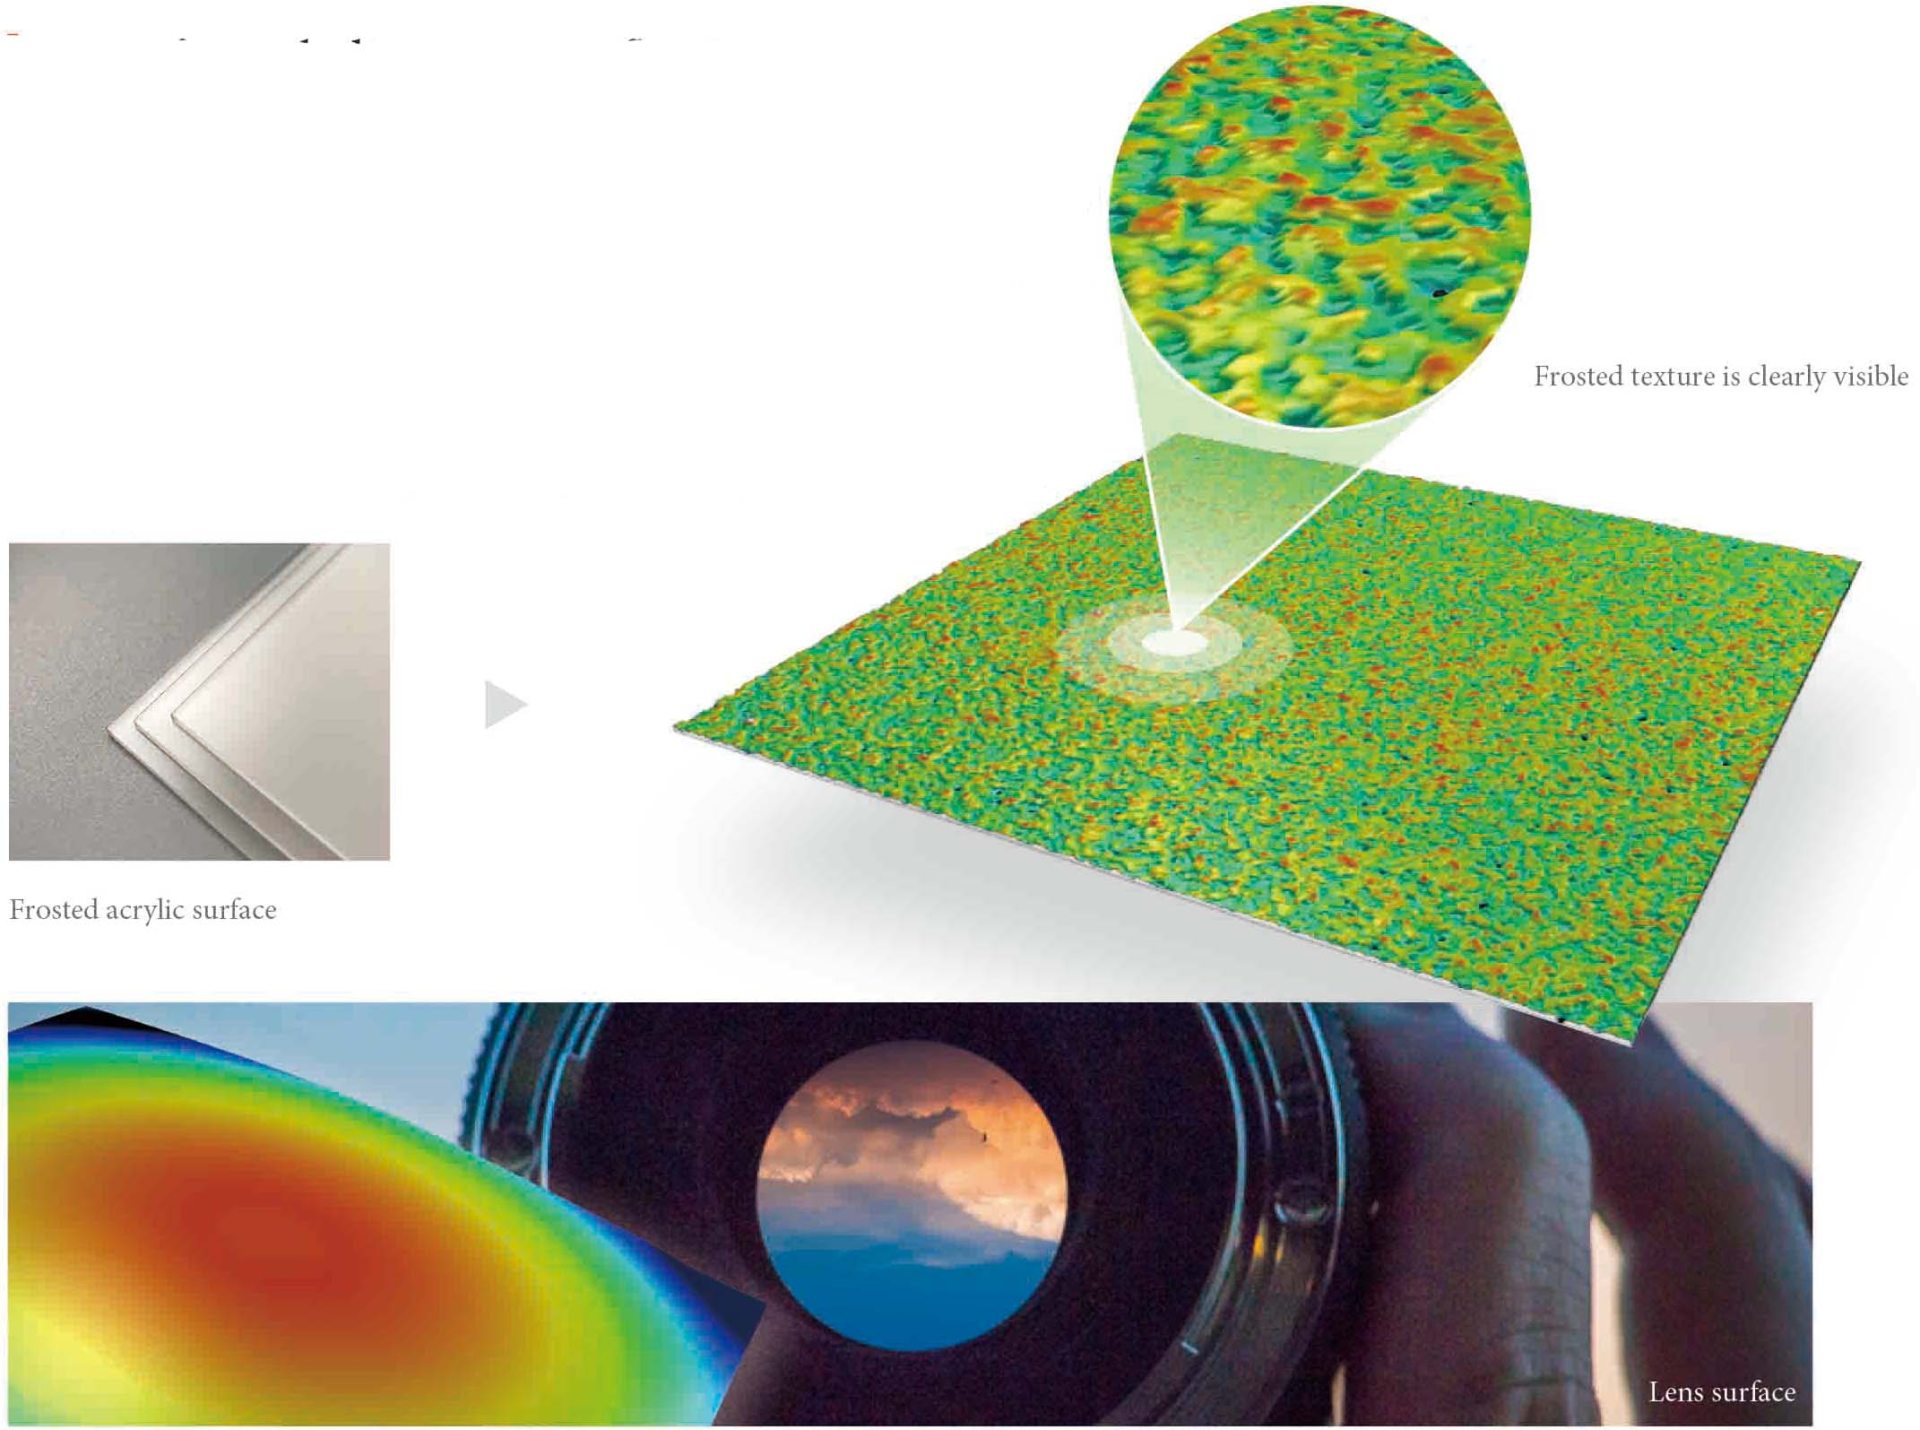
Surface topography measurement of transparent materials is a technical problem that has plagued the optical measurement industry for many years. The reason is that there is only weak directional reflection after the measurement light is projected on the surface of the measured object, which requires extremely high sensitivity and signal-to-noise ratio of the measurement equipment. ICX series has upgraded the traditional spectral confocal system, which can easily identify the interface between the transparent object and the air, and solve the problem of transparent and semi-transparent objects (such as microarray lenses, microfluidic chips, hydrogels, etc.) difficult to measure imaging problems.
| 2nm Z-axis resolution, resolving subtle height differences
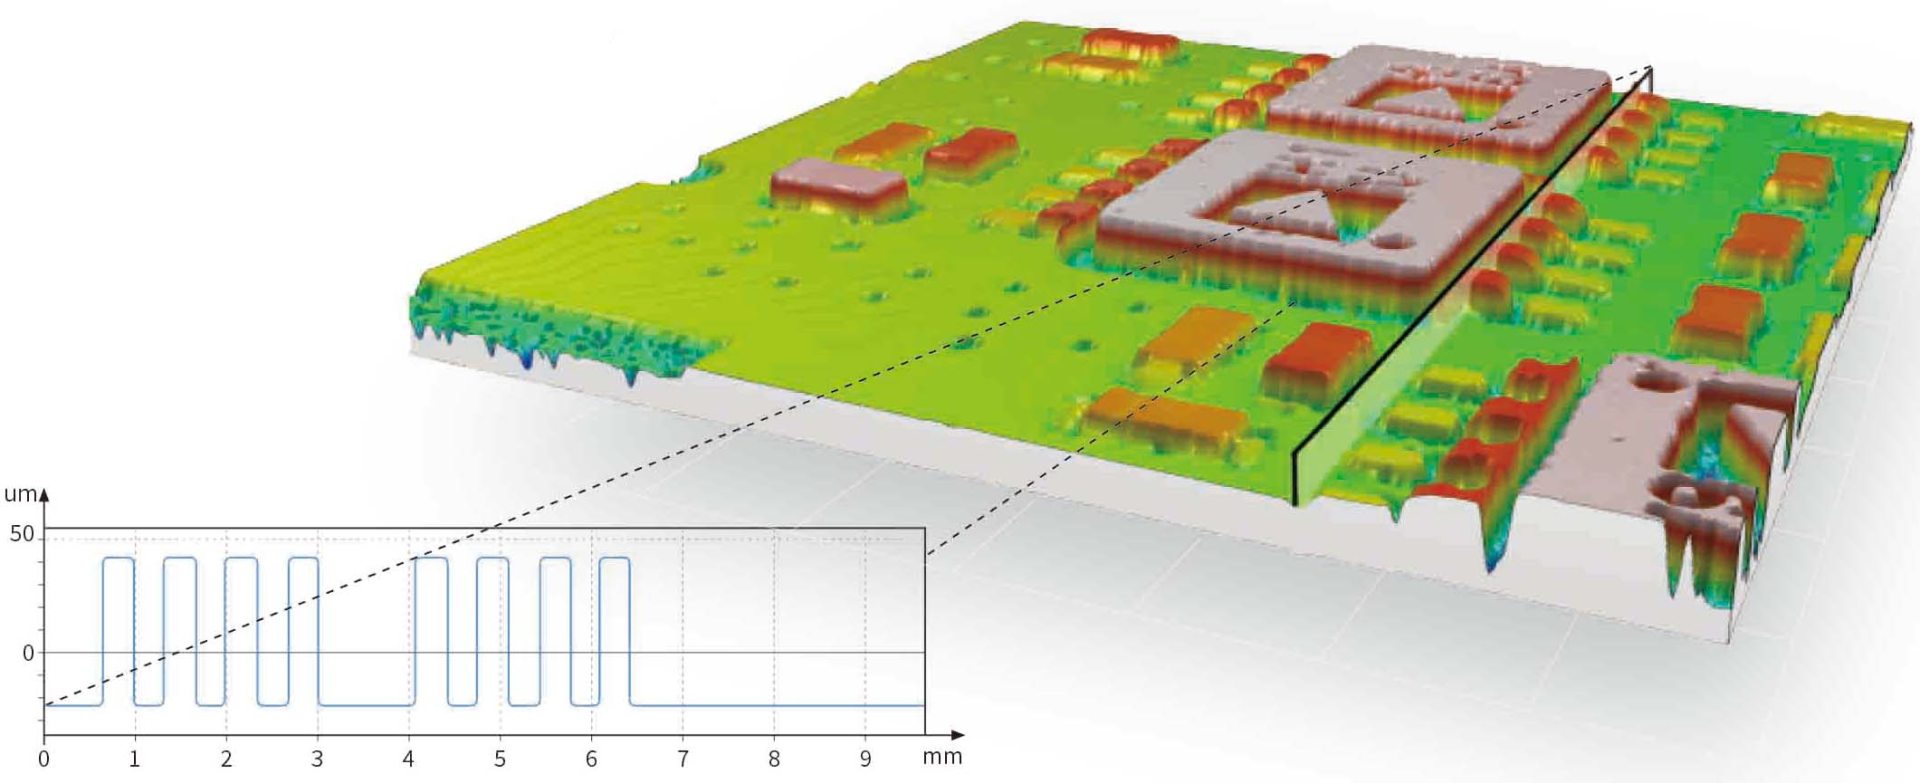
In some fields, the measurement accuracy of step height is very concerned. The smaller the shape difference, the more likely it is to represent the quality of the product or the quality of the manufacturing process. For example, in the wafer manufacturing industry, the size difference of components is close to the nanometer level, and a high-precision non-contact three-dimensional measurement scheme must be adopted.
ICX’s advanced spectral confocal system, with a Z-axis resolution of up to 2nm, ensures that dimensional features with minimal topographic differences can be measured.
| Large XYZ scanning imaging range
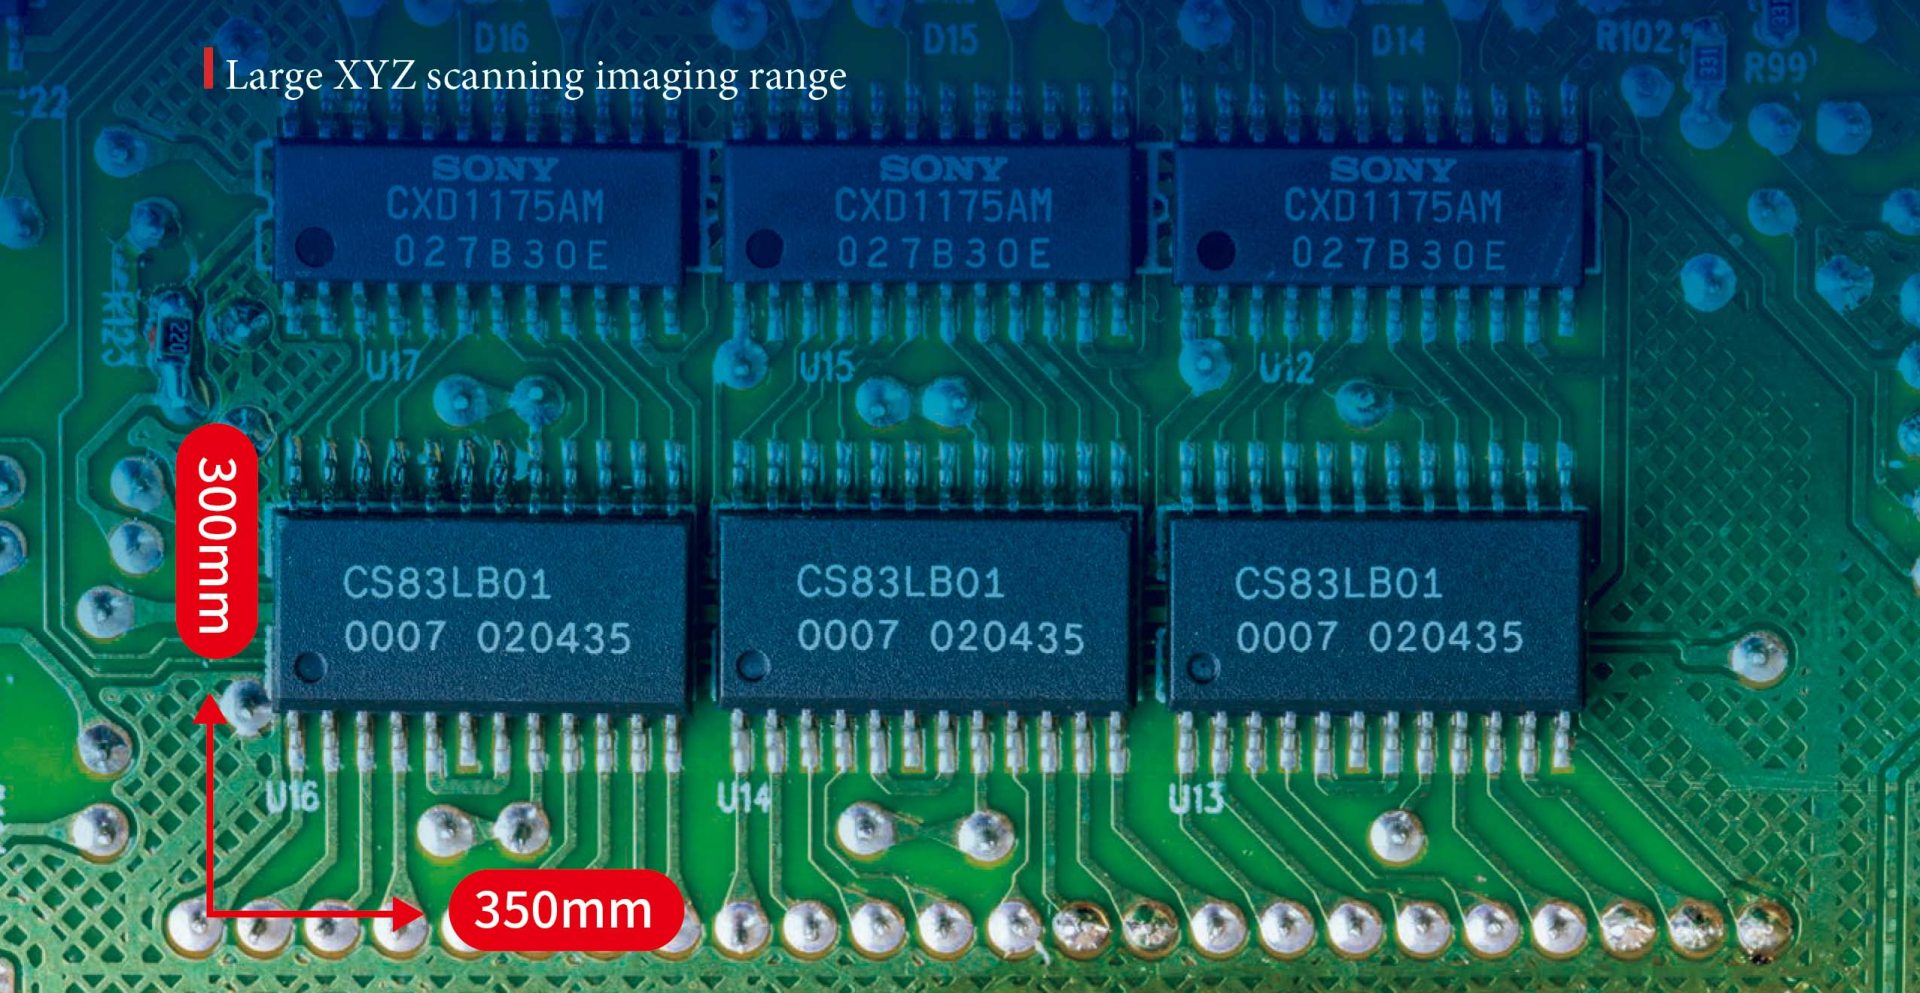
The standard ICX model configuration adopts a microscope-type structure design. The high-precision motorized stage has a large stroke of 350mm × 300mm and an ultra-fast movement speed of 80mm/s. ICOE can also provide users with a gantry-type structure, combined with a large-range spectral confocal lens module, to achieve a scanning imaging range of 1400mm×1400mm×10mm.
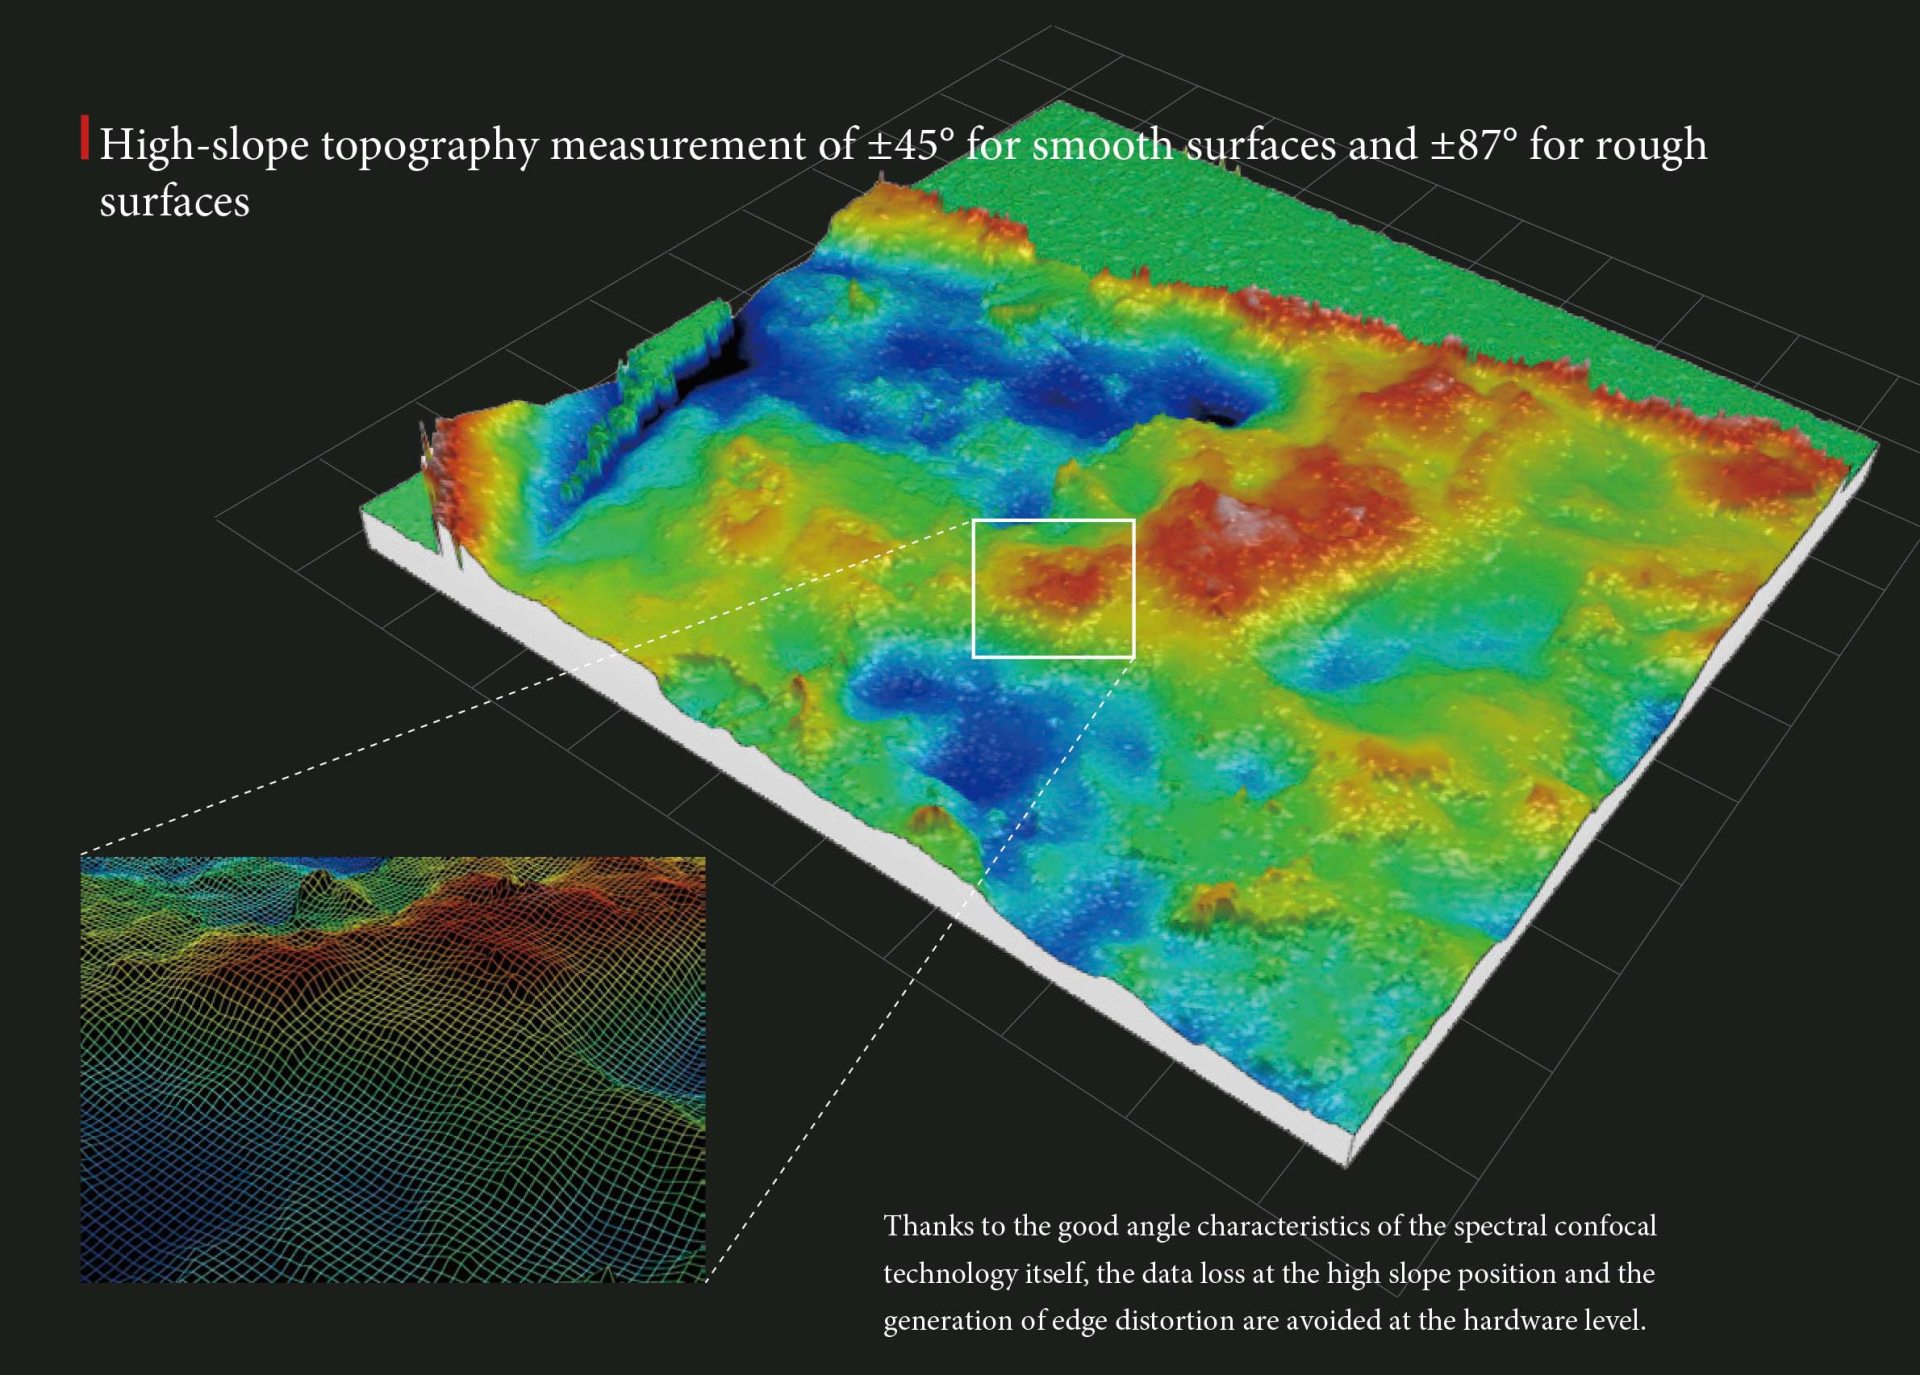
| High-slope topography measurement of ±45° for smooth surfaces and ±87° for rough surfaces
Thanks to the good angle characteristics of the spectral confocal technology itself, the data loss at the high slope position and the generation of edge distortion are avoided at the hardware level.
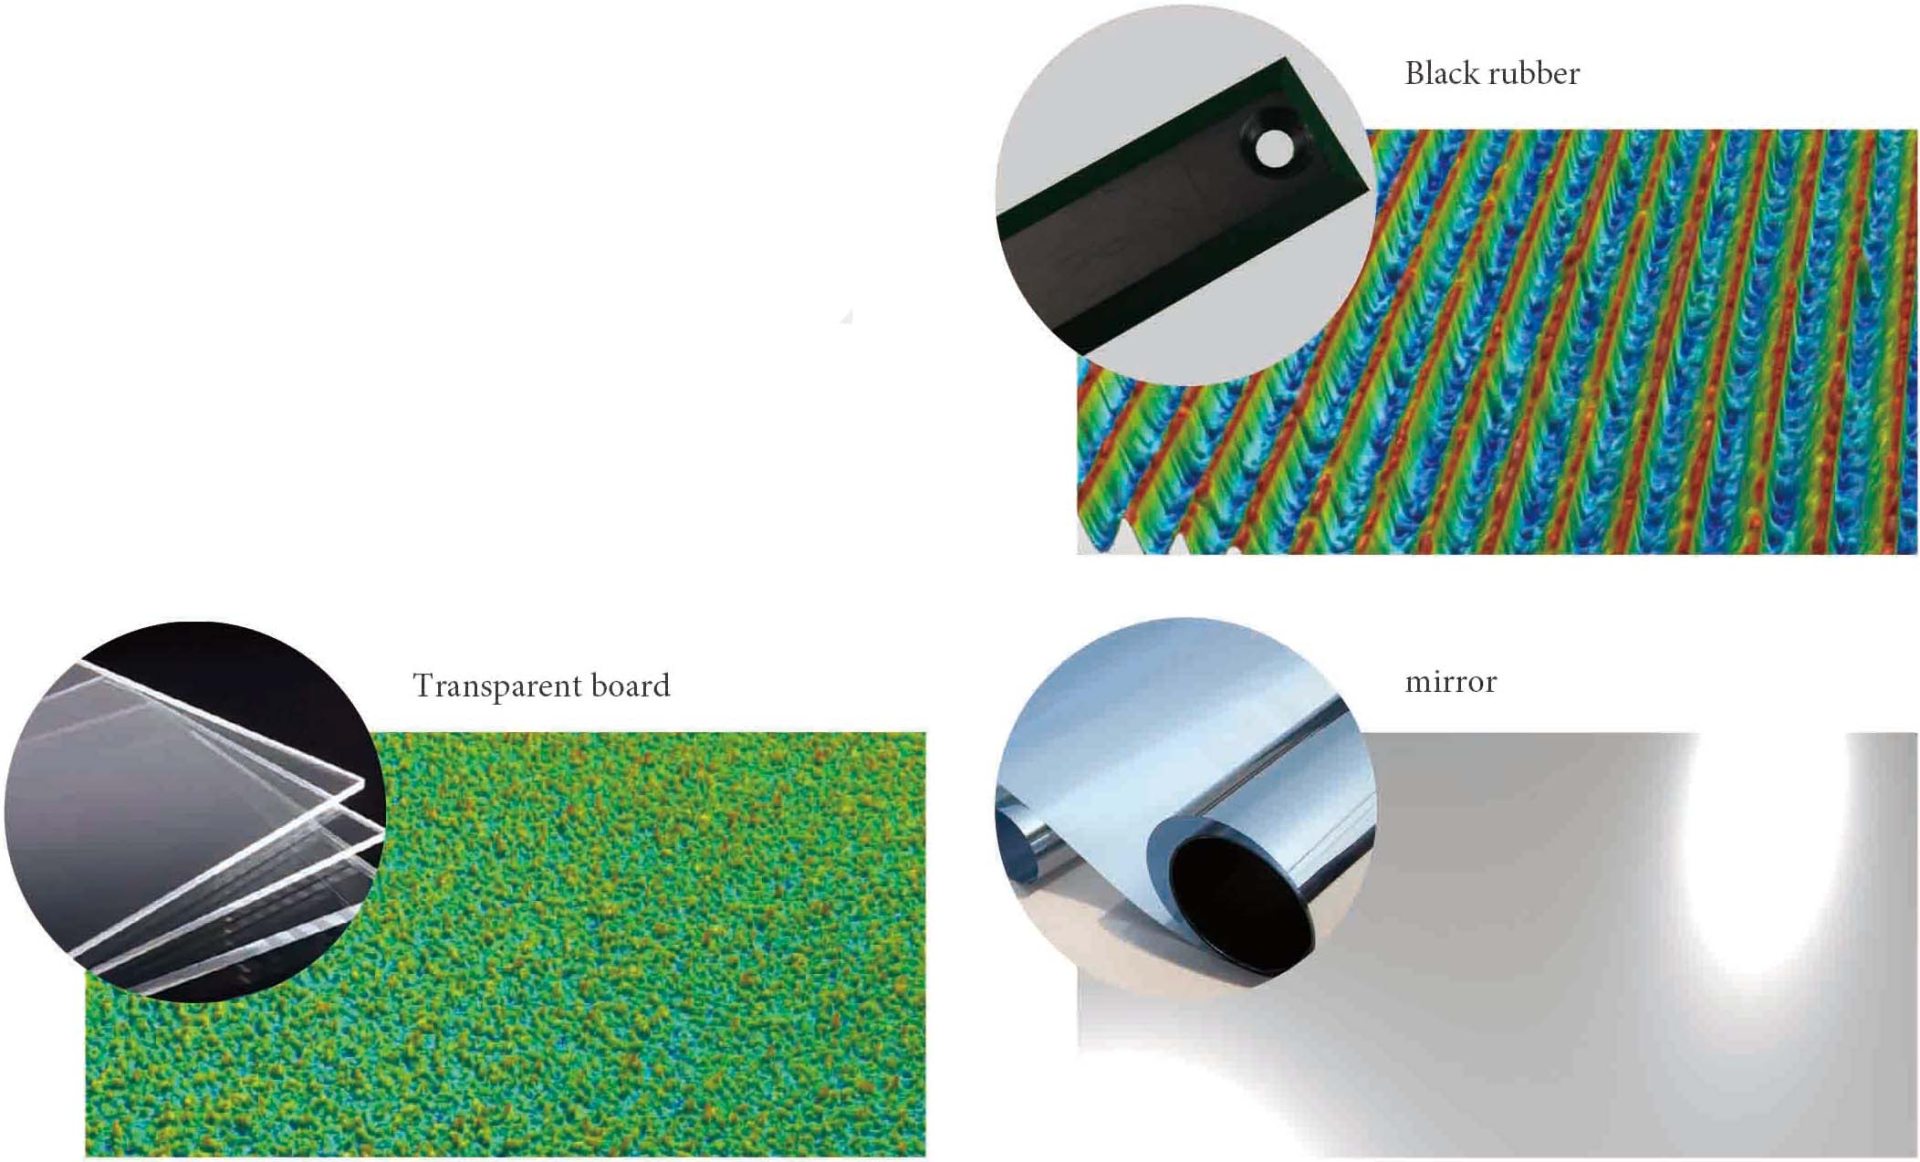
| Super material adaptability, strong light absorption and strong reflection material can be measured
When scanning materials with different reflectances, it is often necessary to fine-tune the output power of the measurement light to ensure a consistent return light effect. The laser-excited polychromatic light used by ICX series has the advantages of high sensitivity and wide dynamic range. The reflectivity is suitable for the surface of 0.05%~100%. It faces highly transparent glass plates, highly absorbing black rubber structural parts, and highly reflective metal mirrors. It is more than equal to a task, making the ICX ideal for scanning composite and multi-material spliced surface.
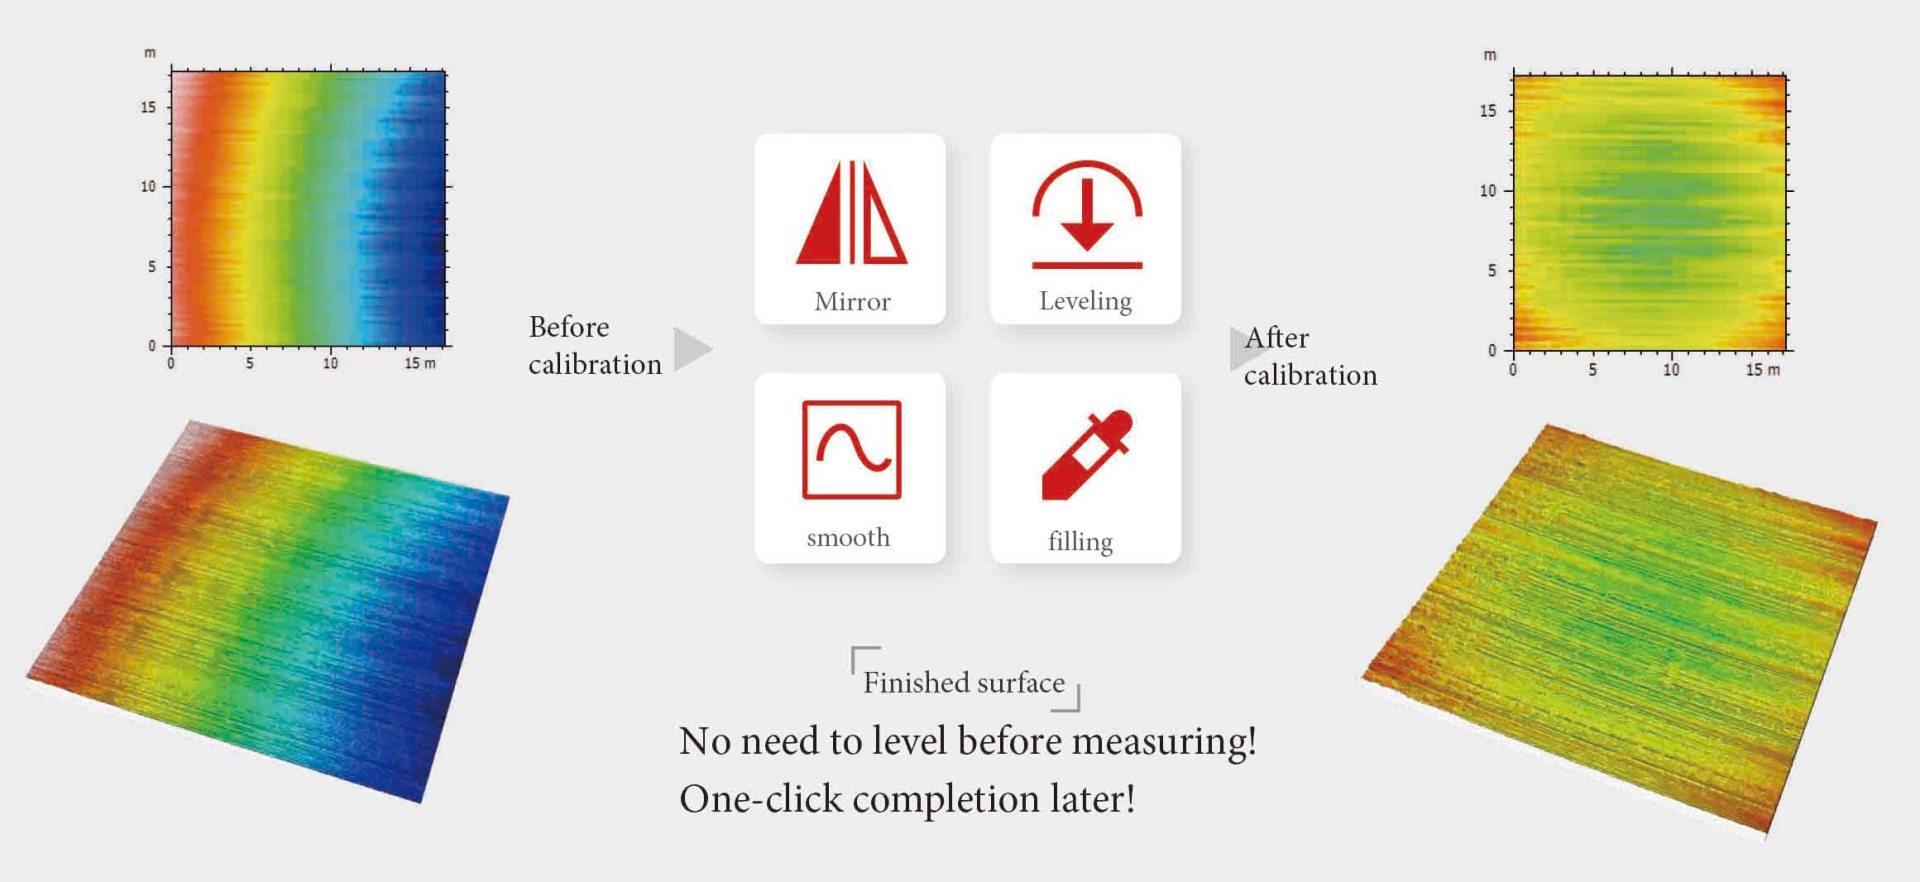
| One-click image processing, no leveling required before measurement
The post-processing operations of KC-MOS all adopt one-click design, which can quickly and accurately complete operations such as leveling mirroring, filling, and smoothing without complicated learning, ensuring that the final image is clear and easy to observe.
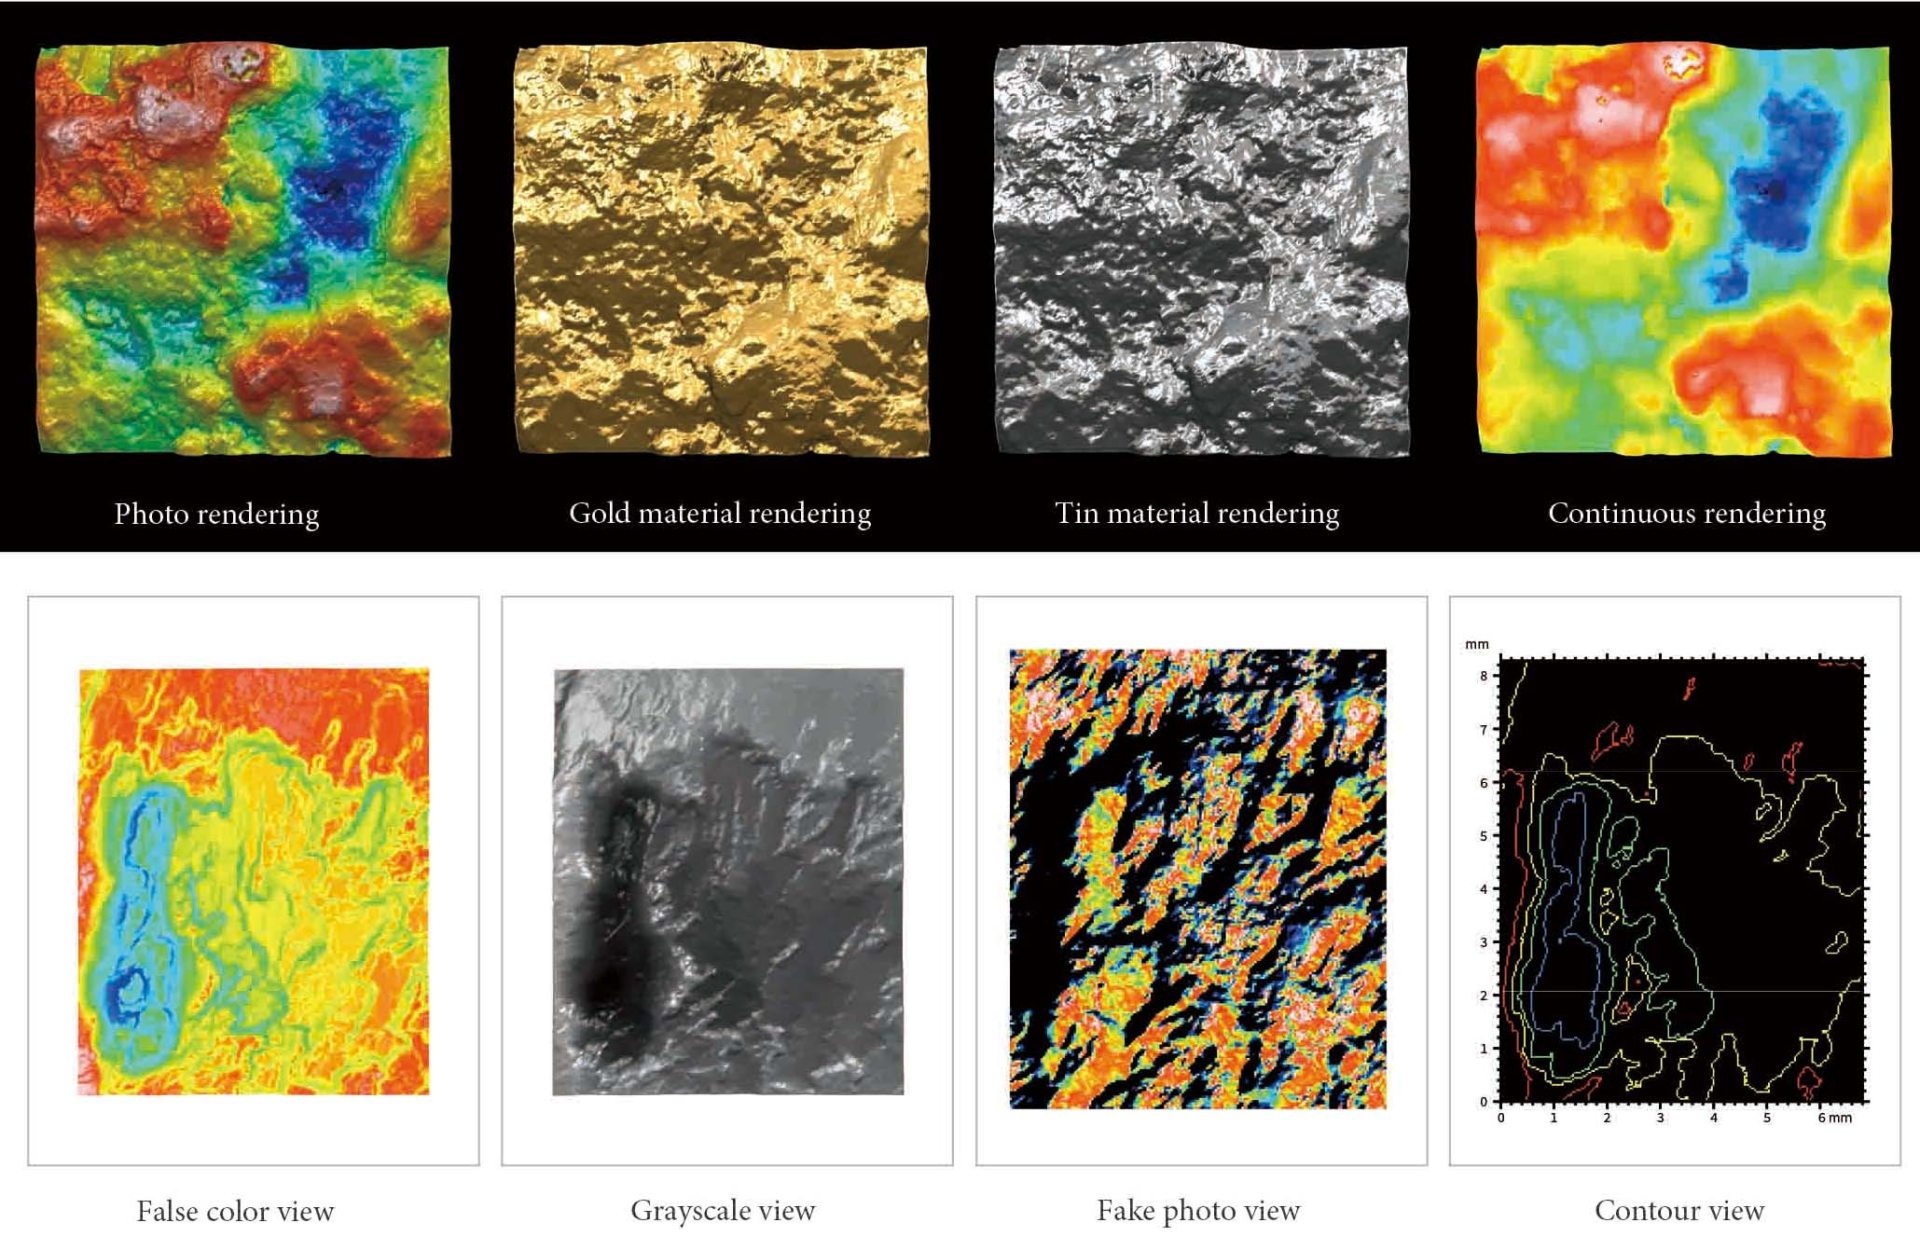
| Customize image rendering to make features more prominent
Raw point cloud data is often difficult to observe effective features. ICX has built-in options for various materials, color scales, gloss, light intensity and light source. After custom configuration, point cloud images look like real photos, making features such as undulations and cracks more visible highlight.
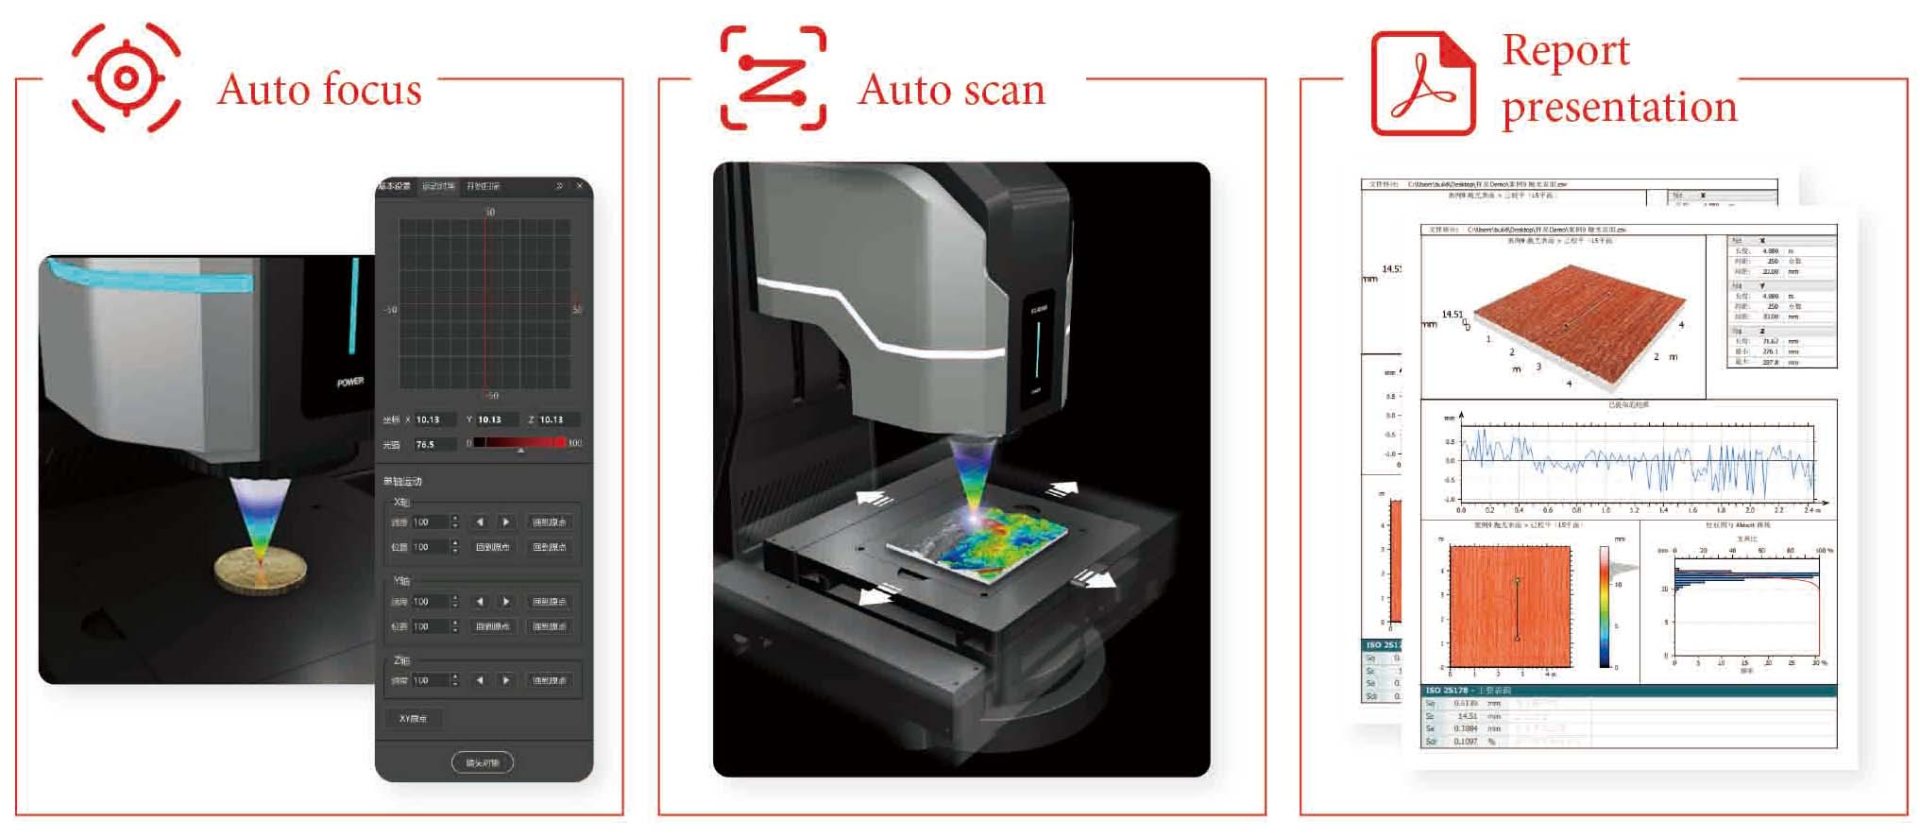
| Friendly human-computer interaction, automatic report generation
KC-MOS software is equipped with a large number of data report templates, the report content includes test information, operator information, plane images, three-dimensional images, data analysis tables, statistical analysis charts, etc. Even users who are new to ICX series product can issue a high-quality test report based on the function navigation animation.
Case Show
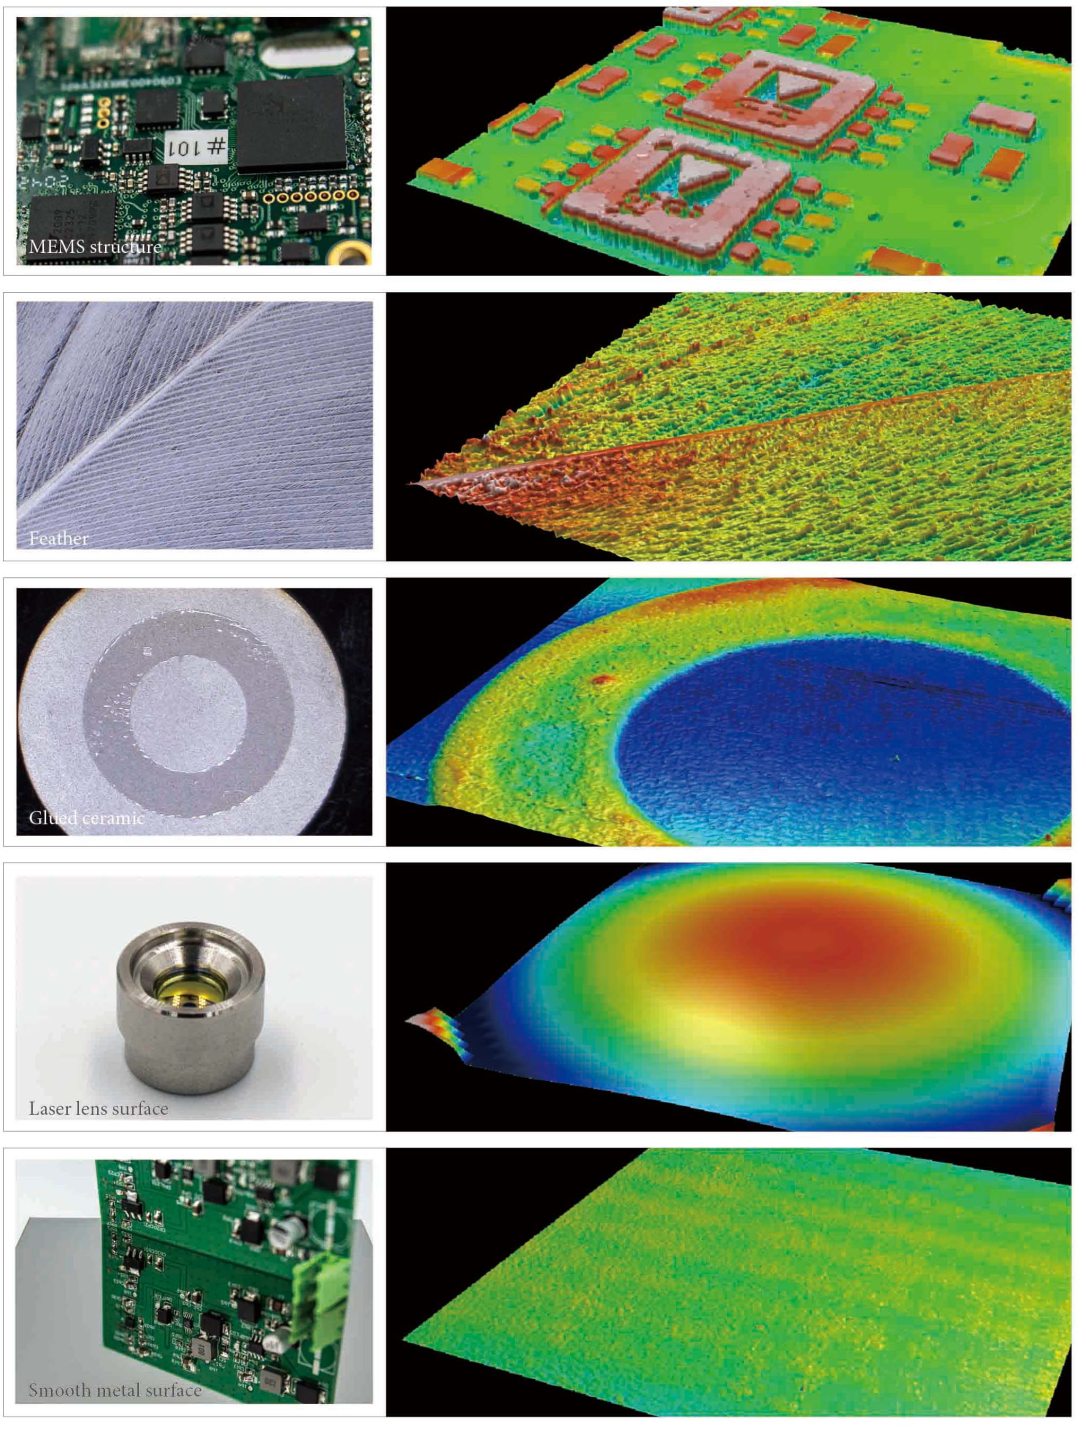
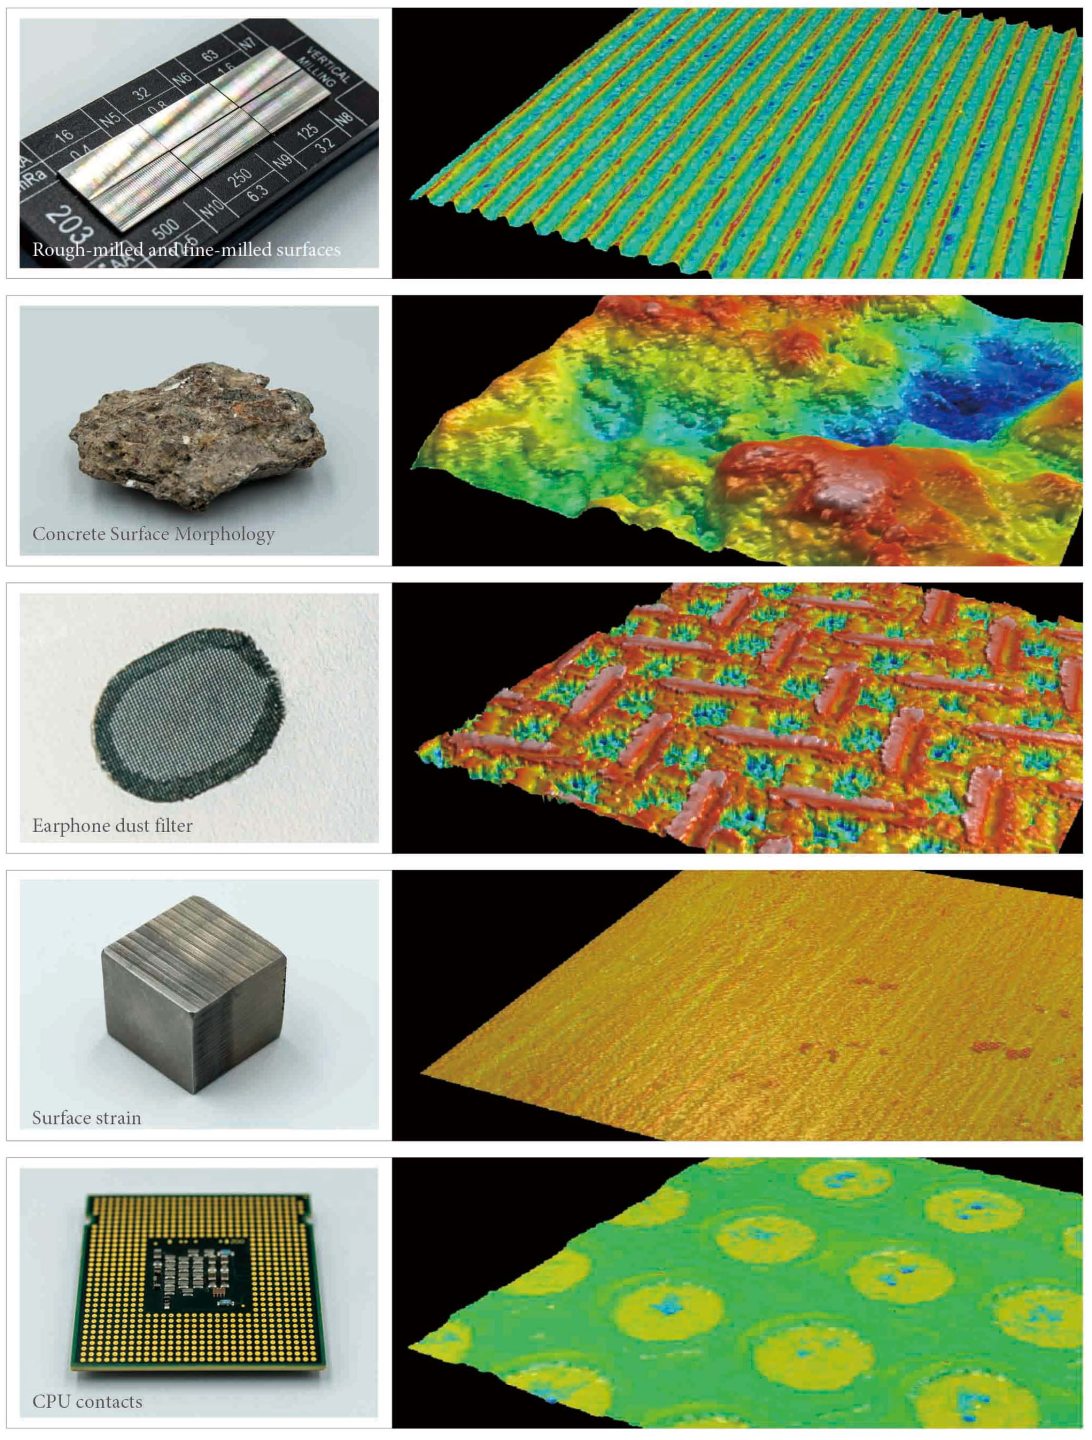
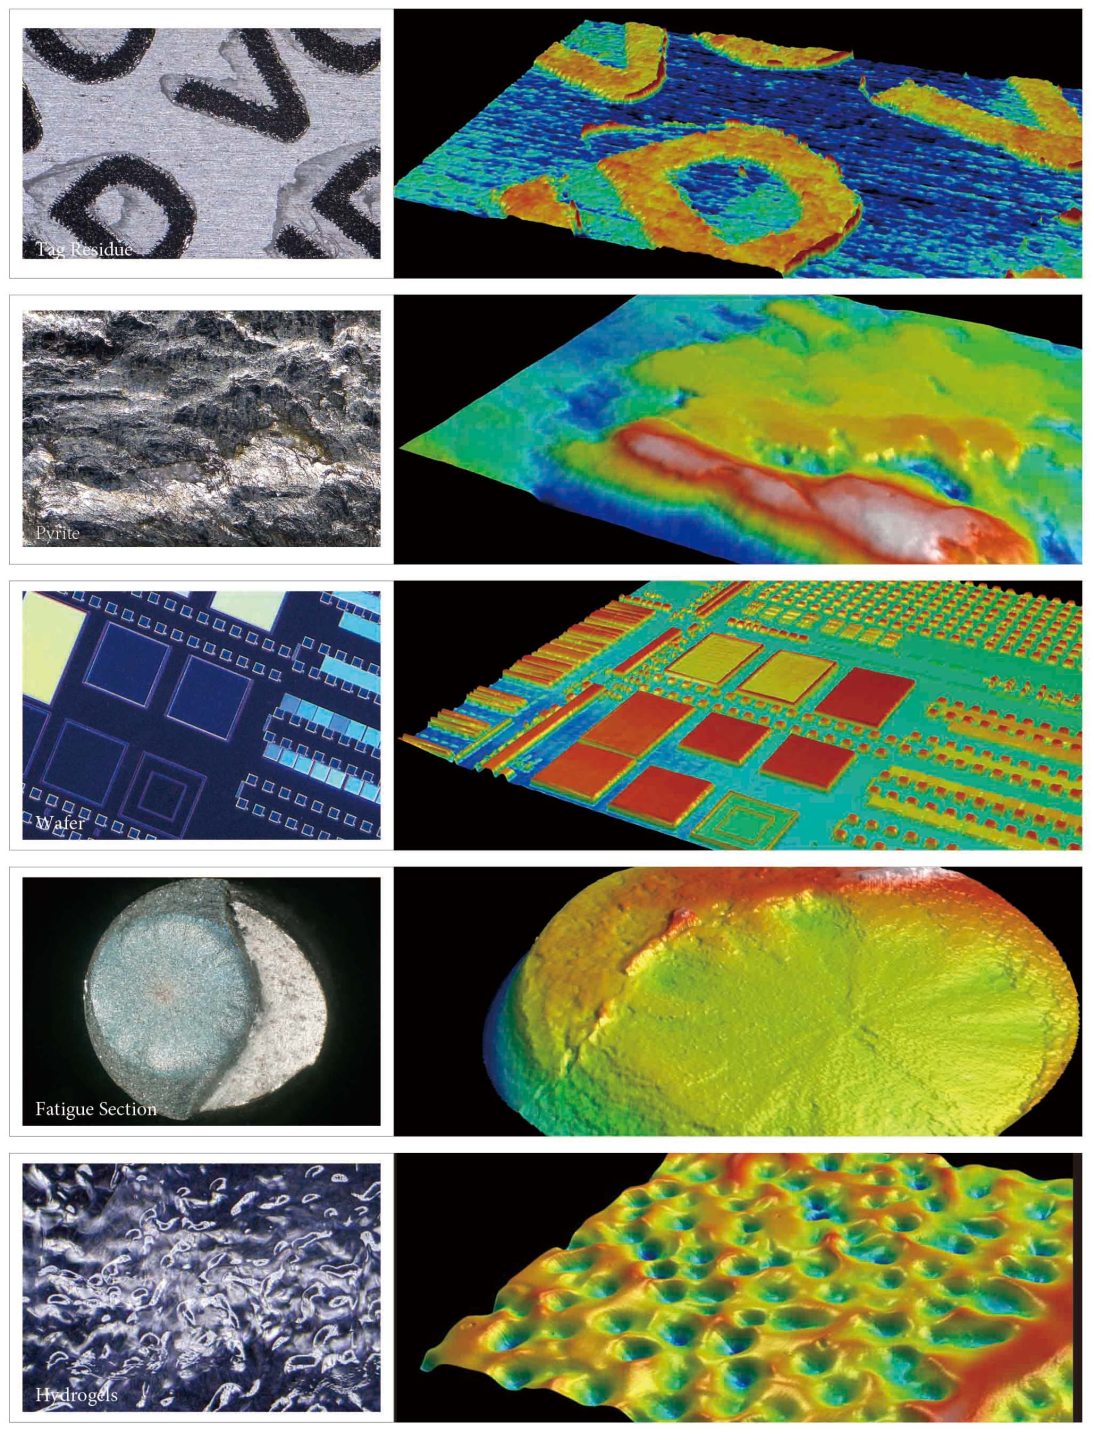
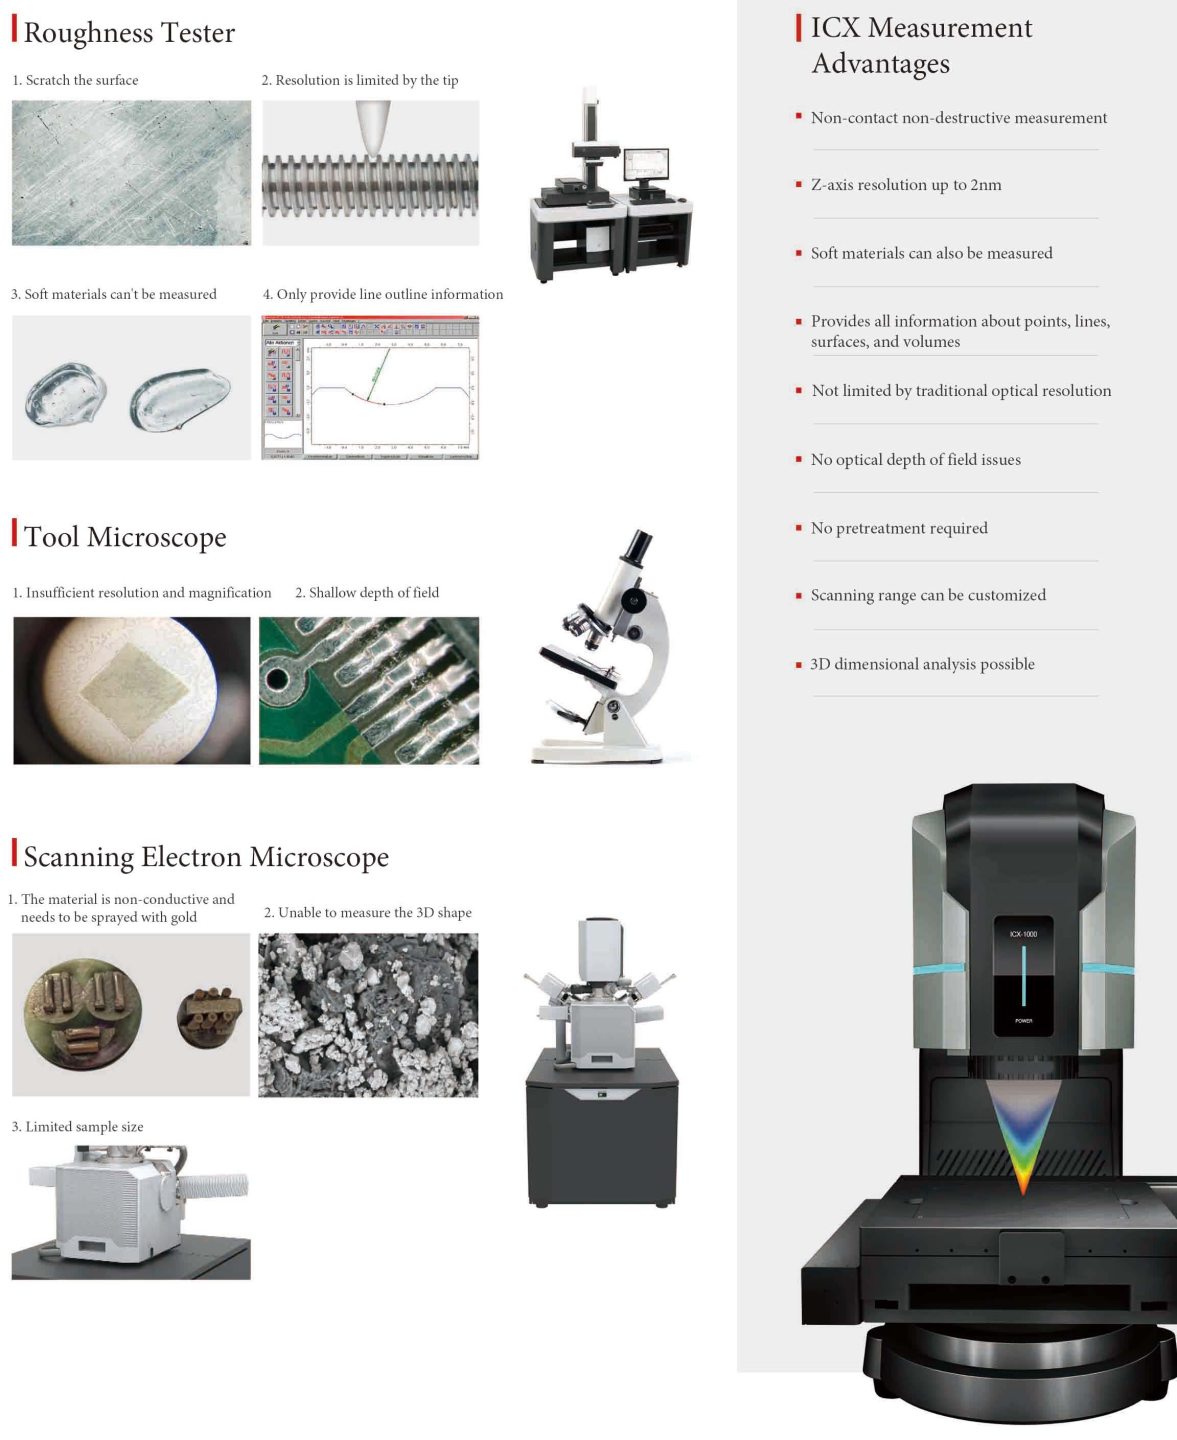
Comparison of measurement methods
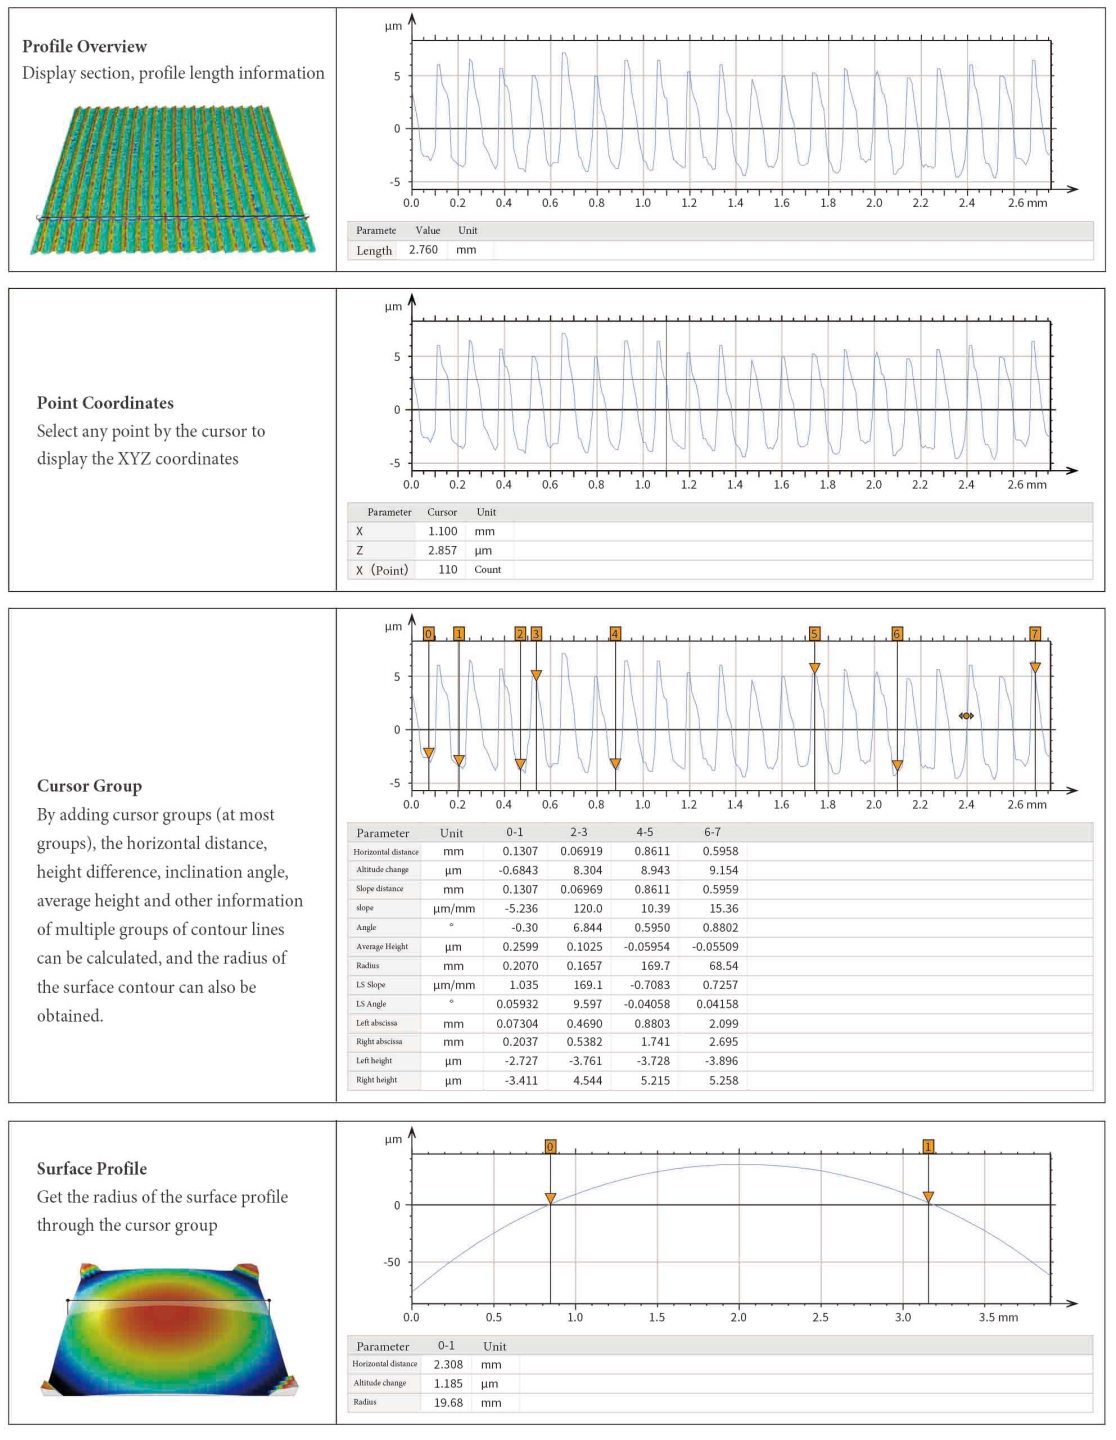
Profile Analysis
| The contour analysis module can extract the profile contour at any position of the 3D image, with various extraction methods and flexible data analysis.
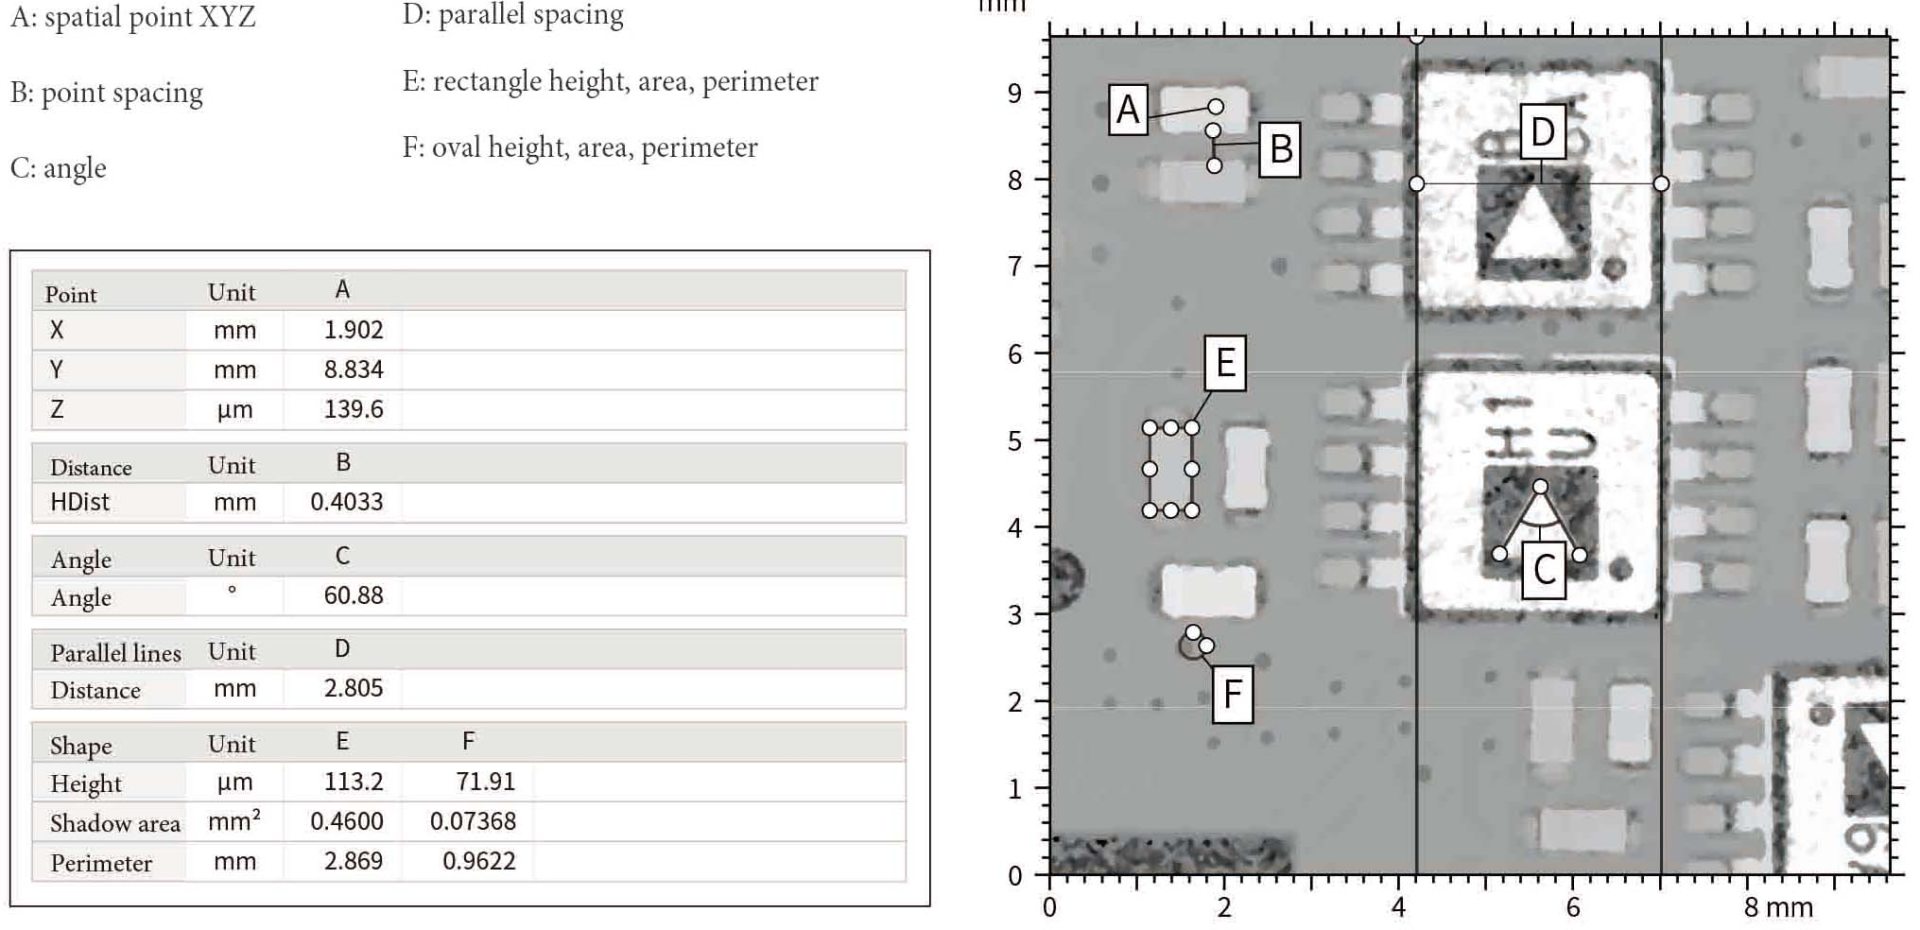
Plane Analysis
| The plane analysis module is used to extract the plane of the 3D image. After grayscale processing, it can be analyzed by a wealth of geometric measurement tools, including
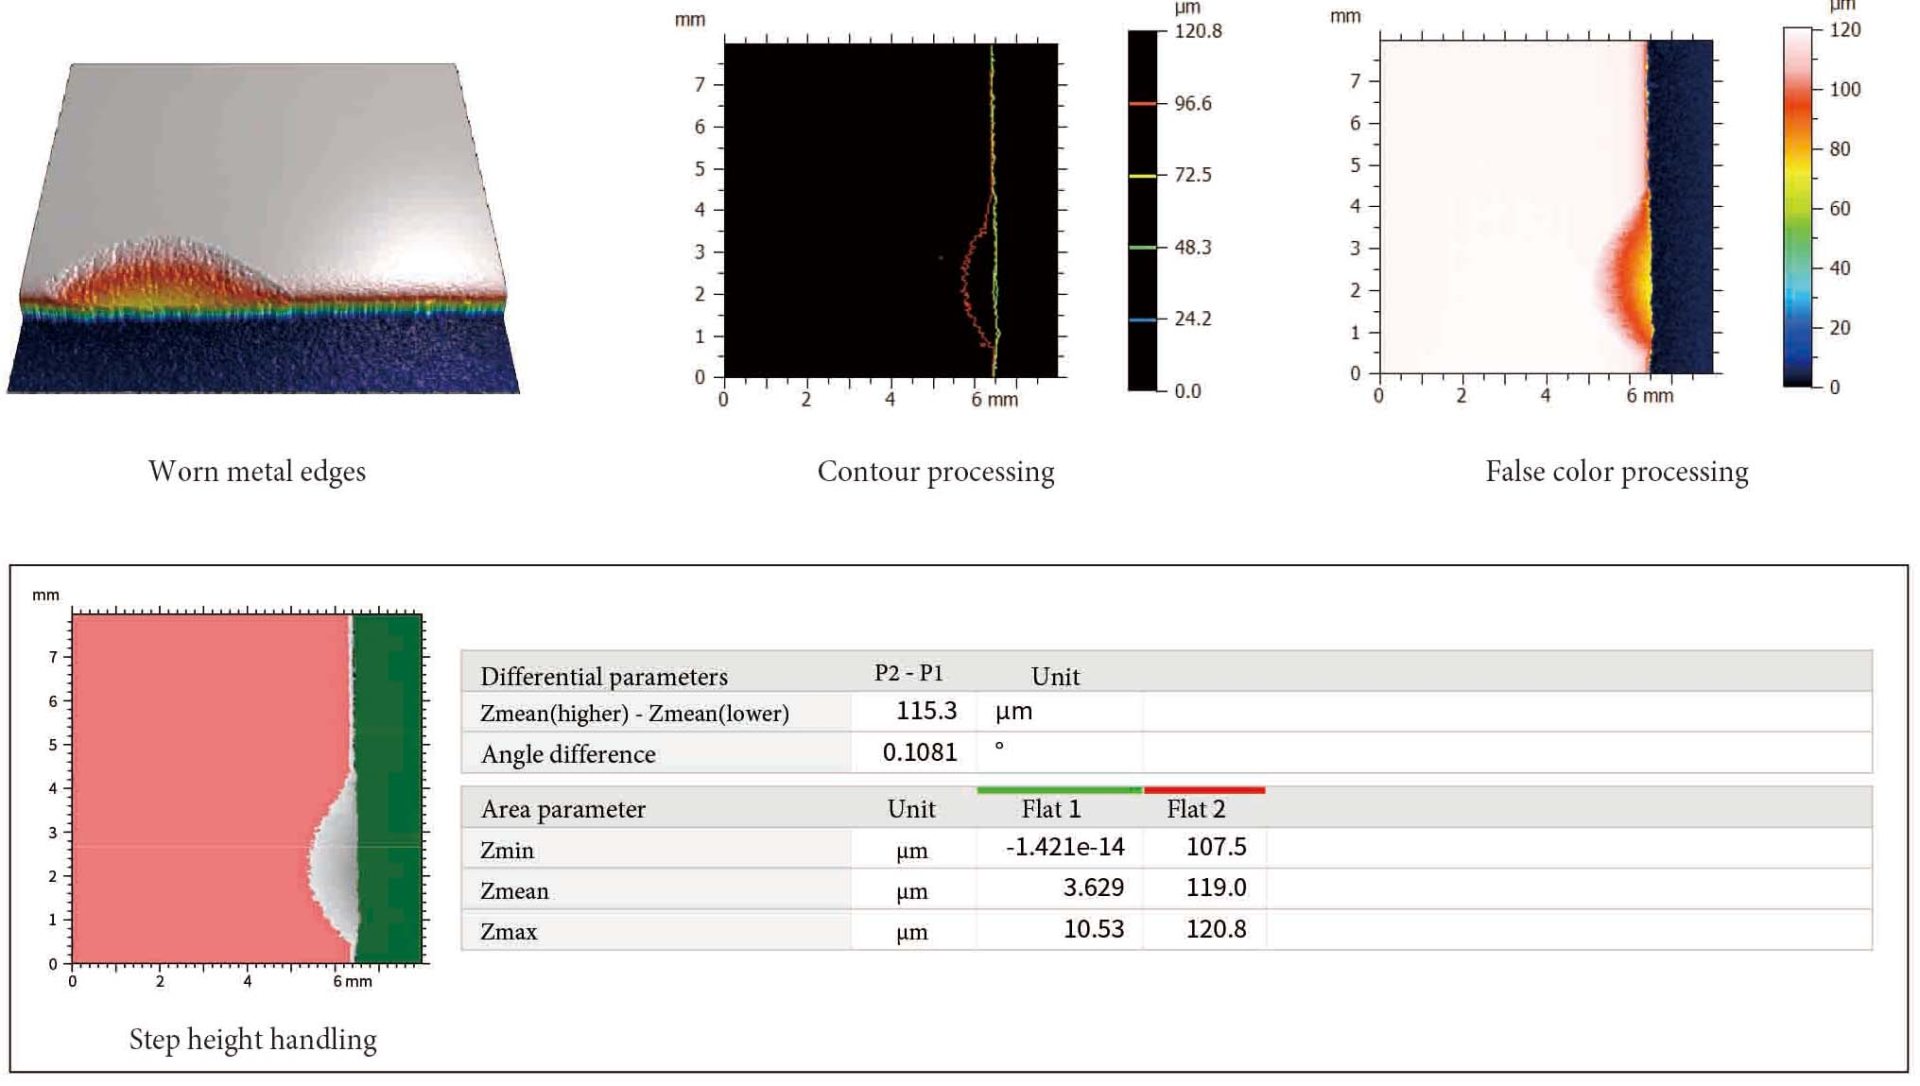
| The image can be processed with contour lines, false colors, step heights, etc., and the surface contour information can be highlighted on the two-dimensional plane.
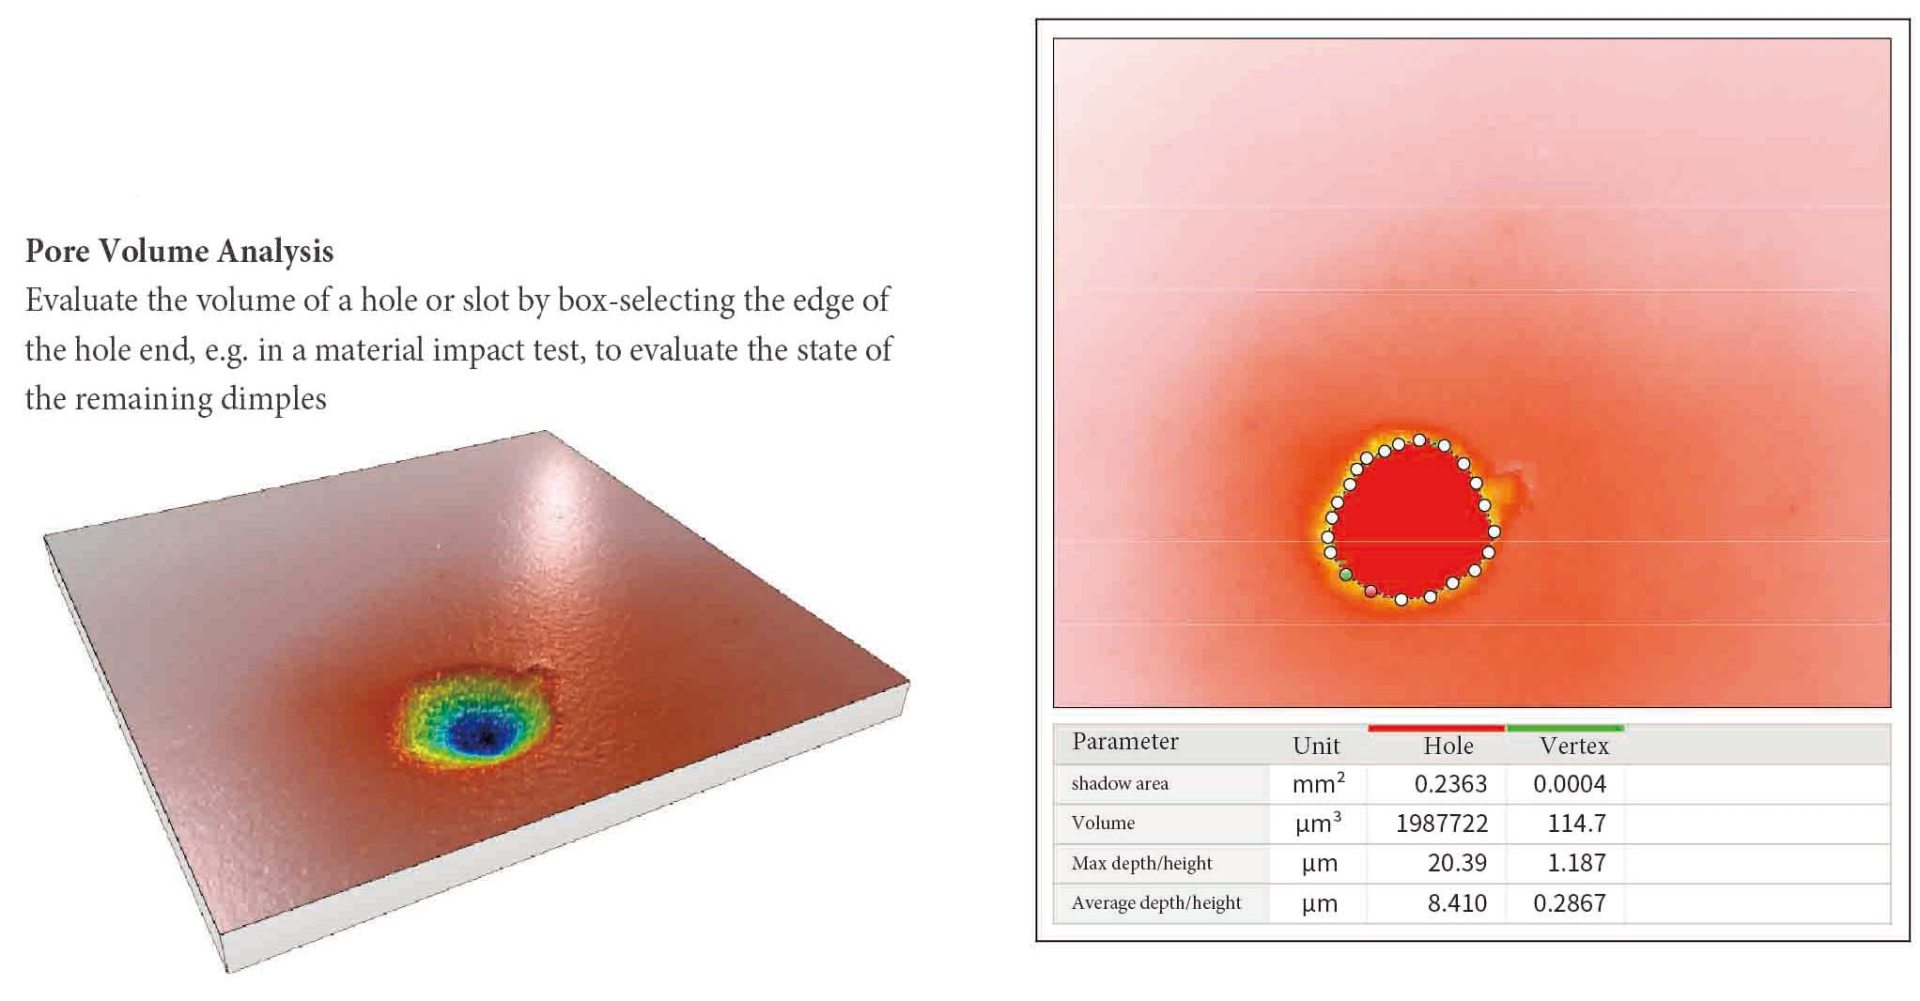
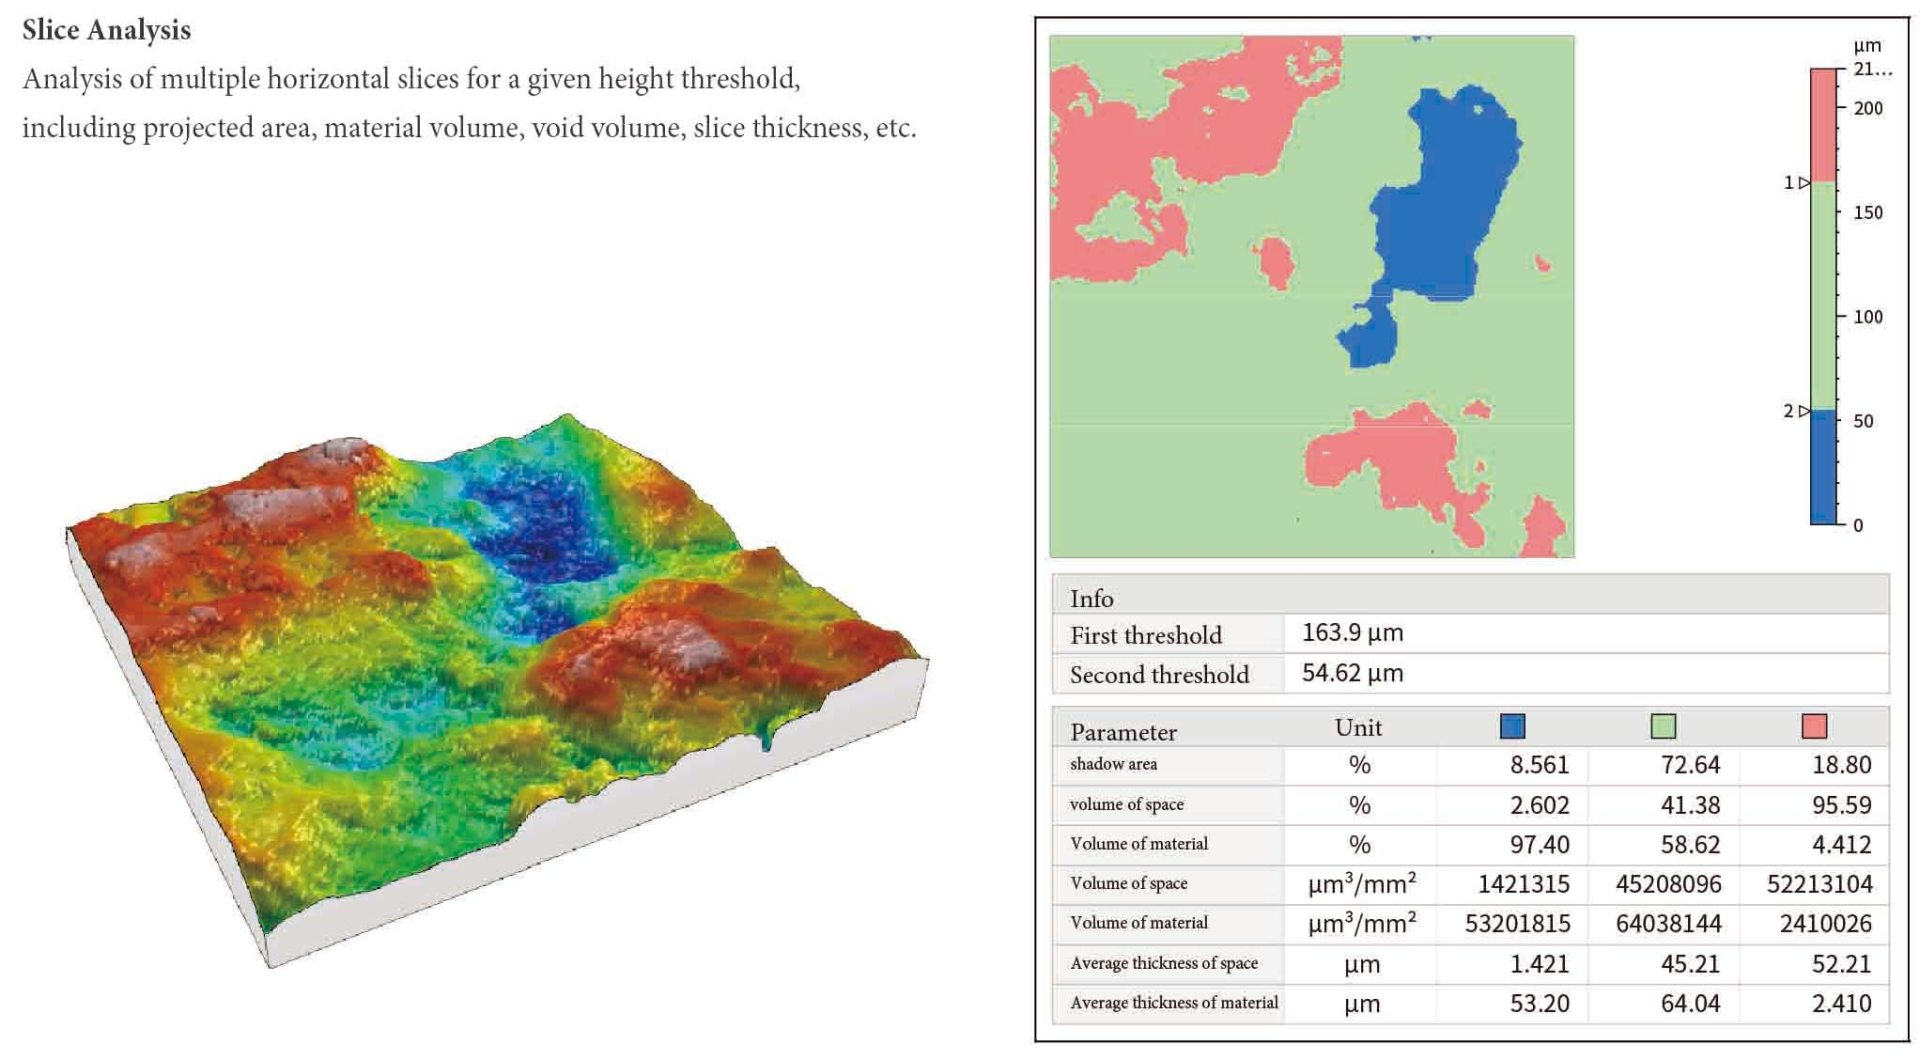
Volume Analysis
| The volume analysis module is mainly divided into pore volume analysis and slice analysis
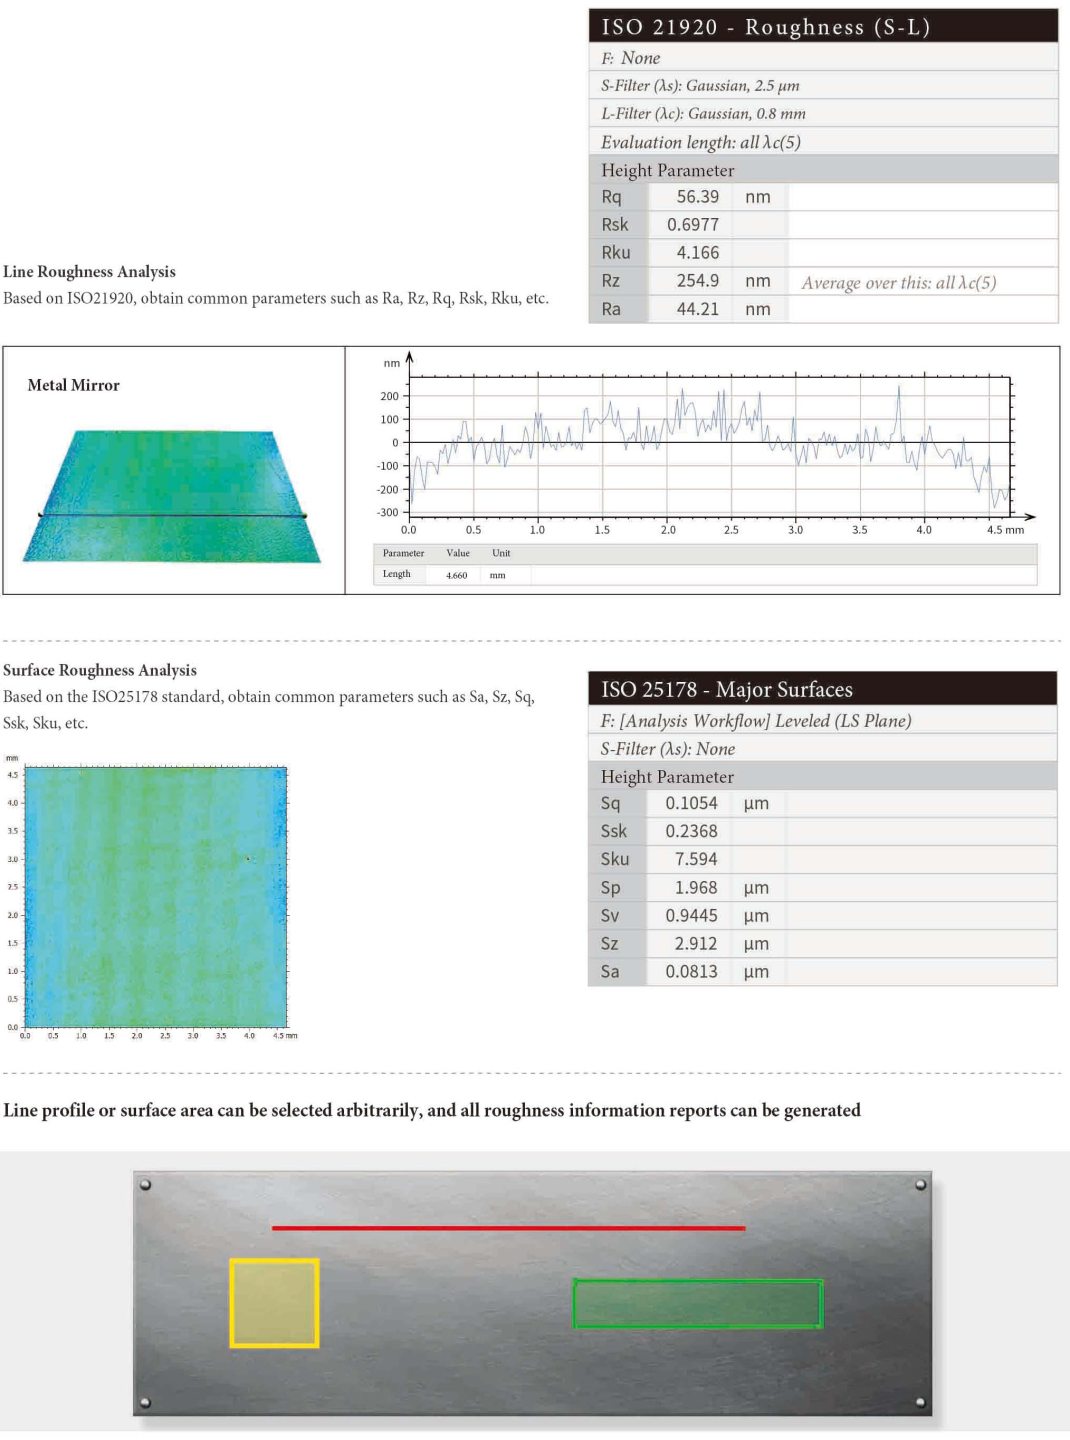
Roughness Analysis
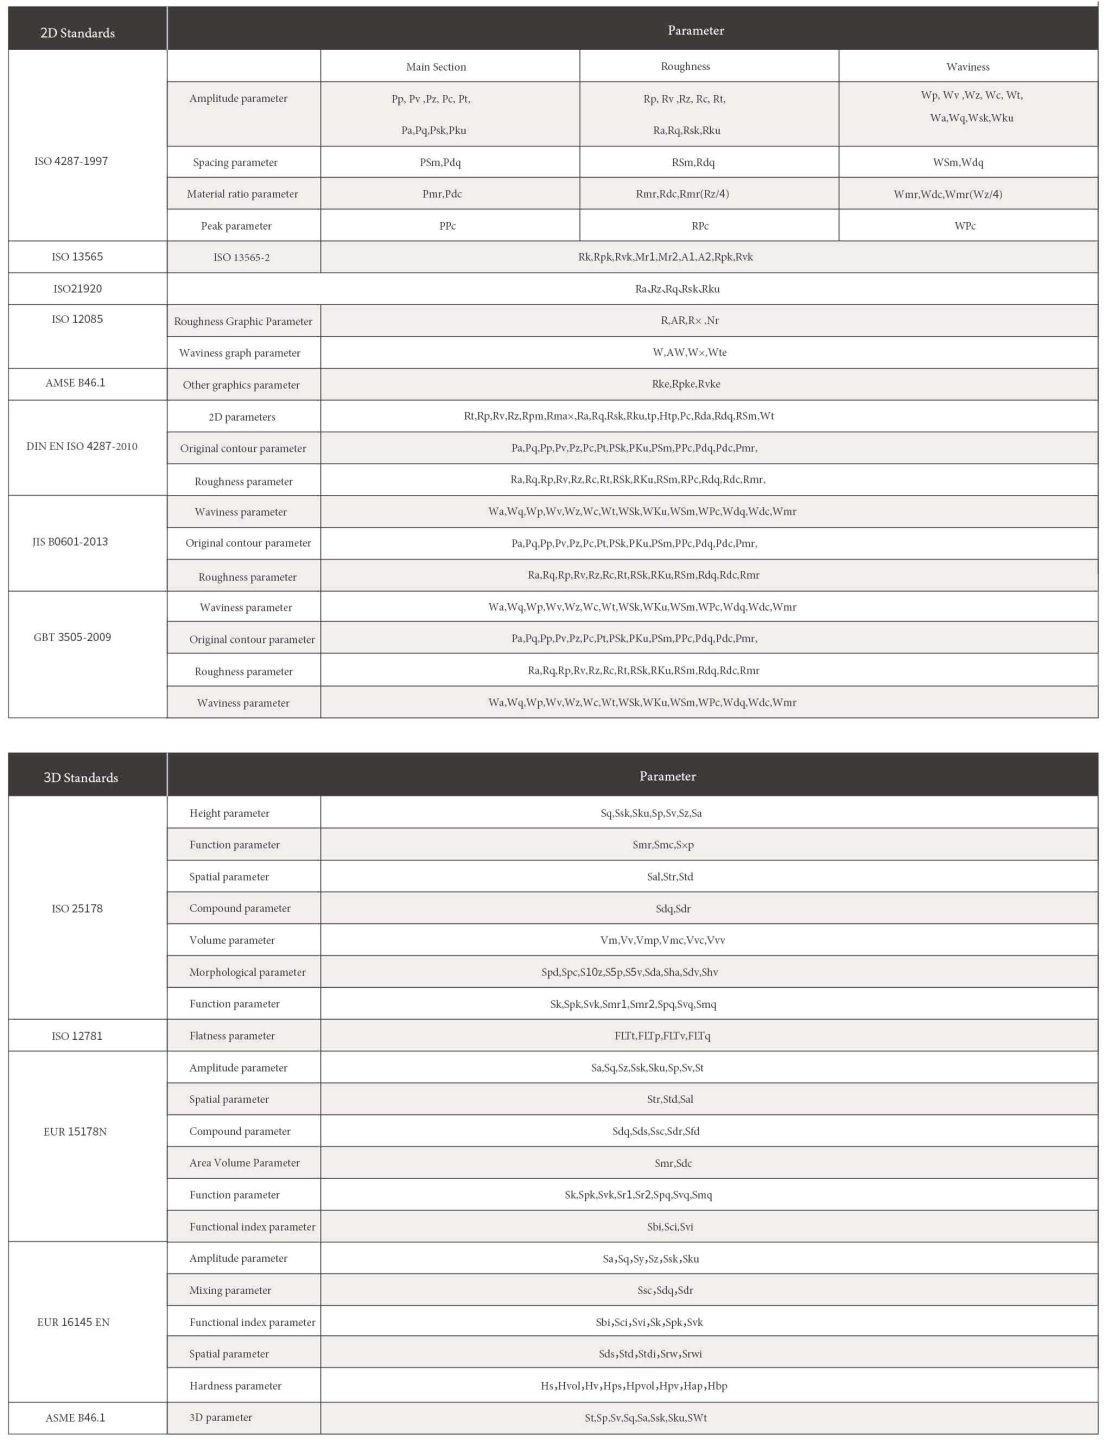
| Compared with the conventional roughness meter, ICX can not only perform line roughness analysis, but also non-contact surface roughness analysis of the entire plane.
Parameter Introduction
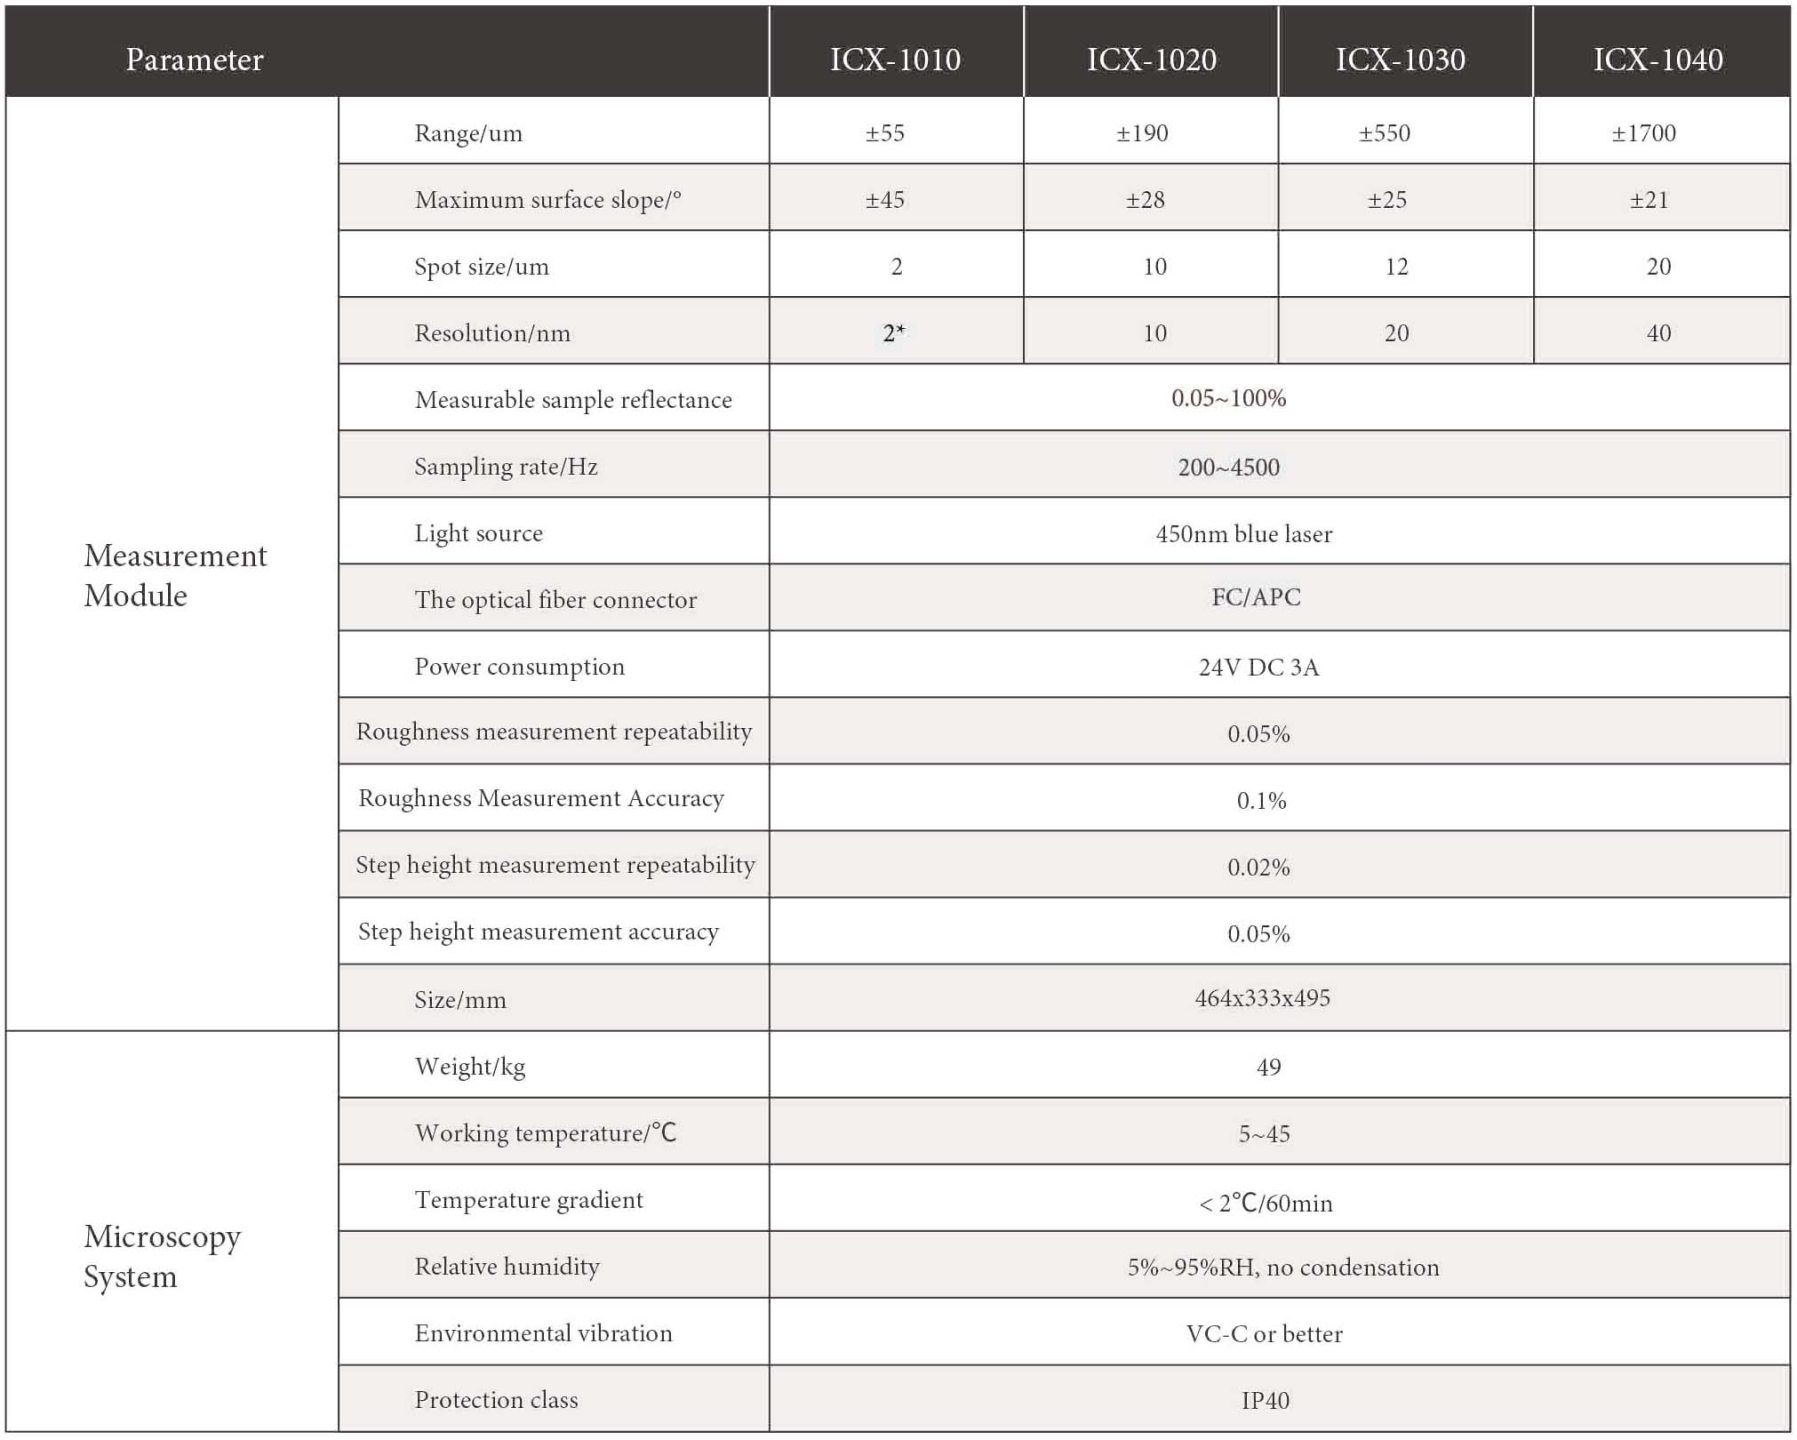 * The value refers to the value of the ICOE standard target (only for KC-H010 nano-step sample) in the laboratory standard measurement mode
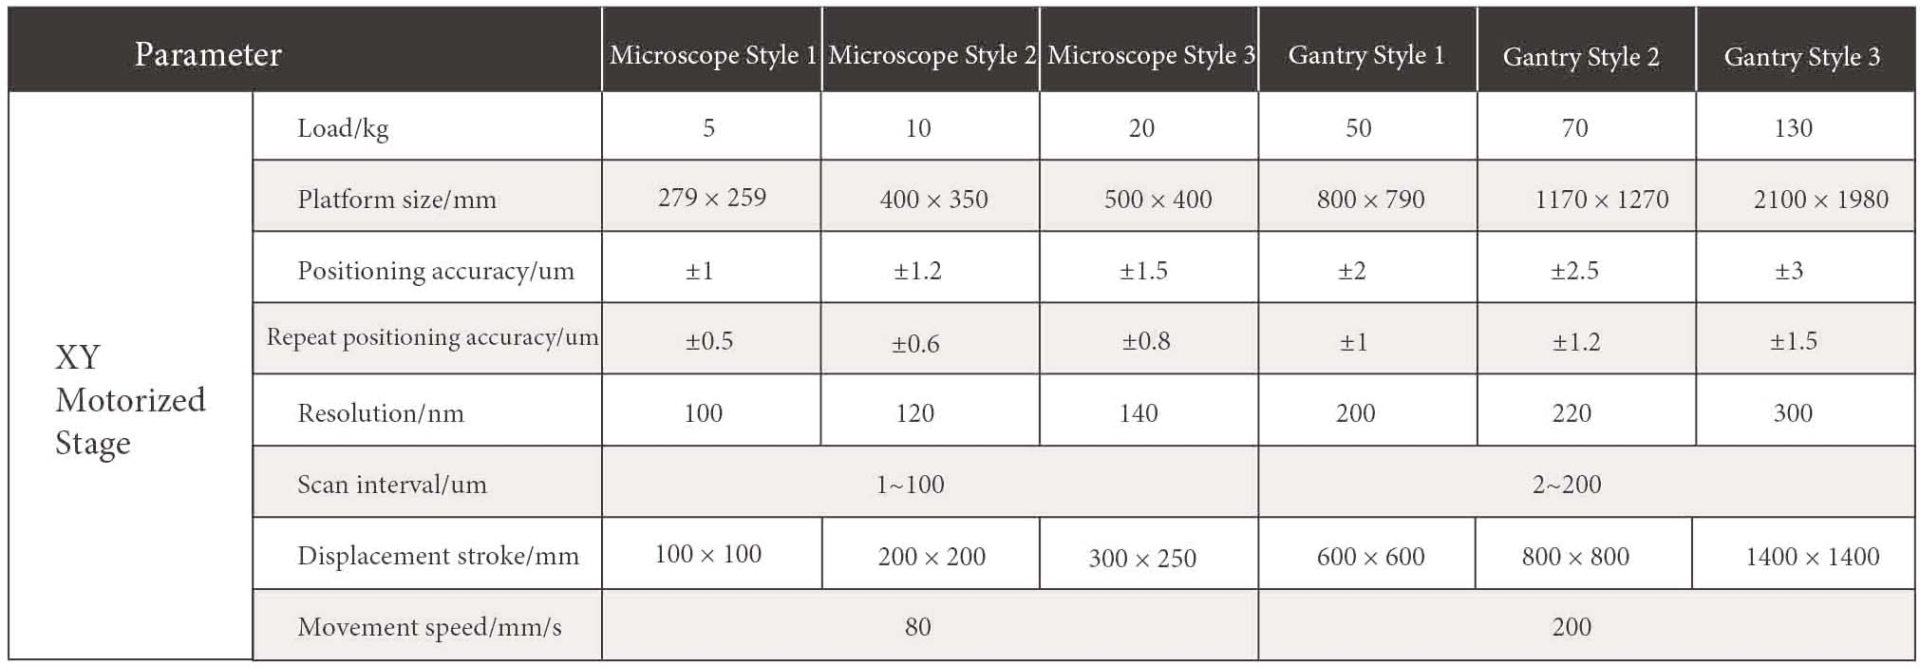
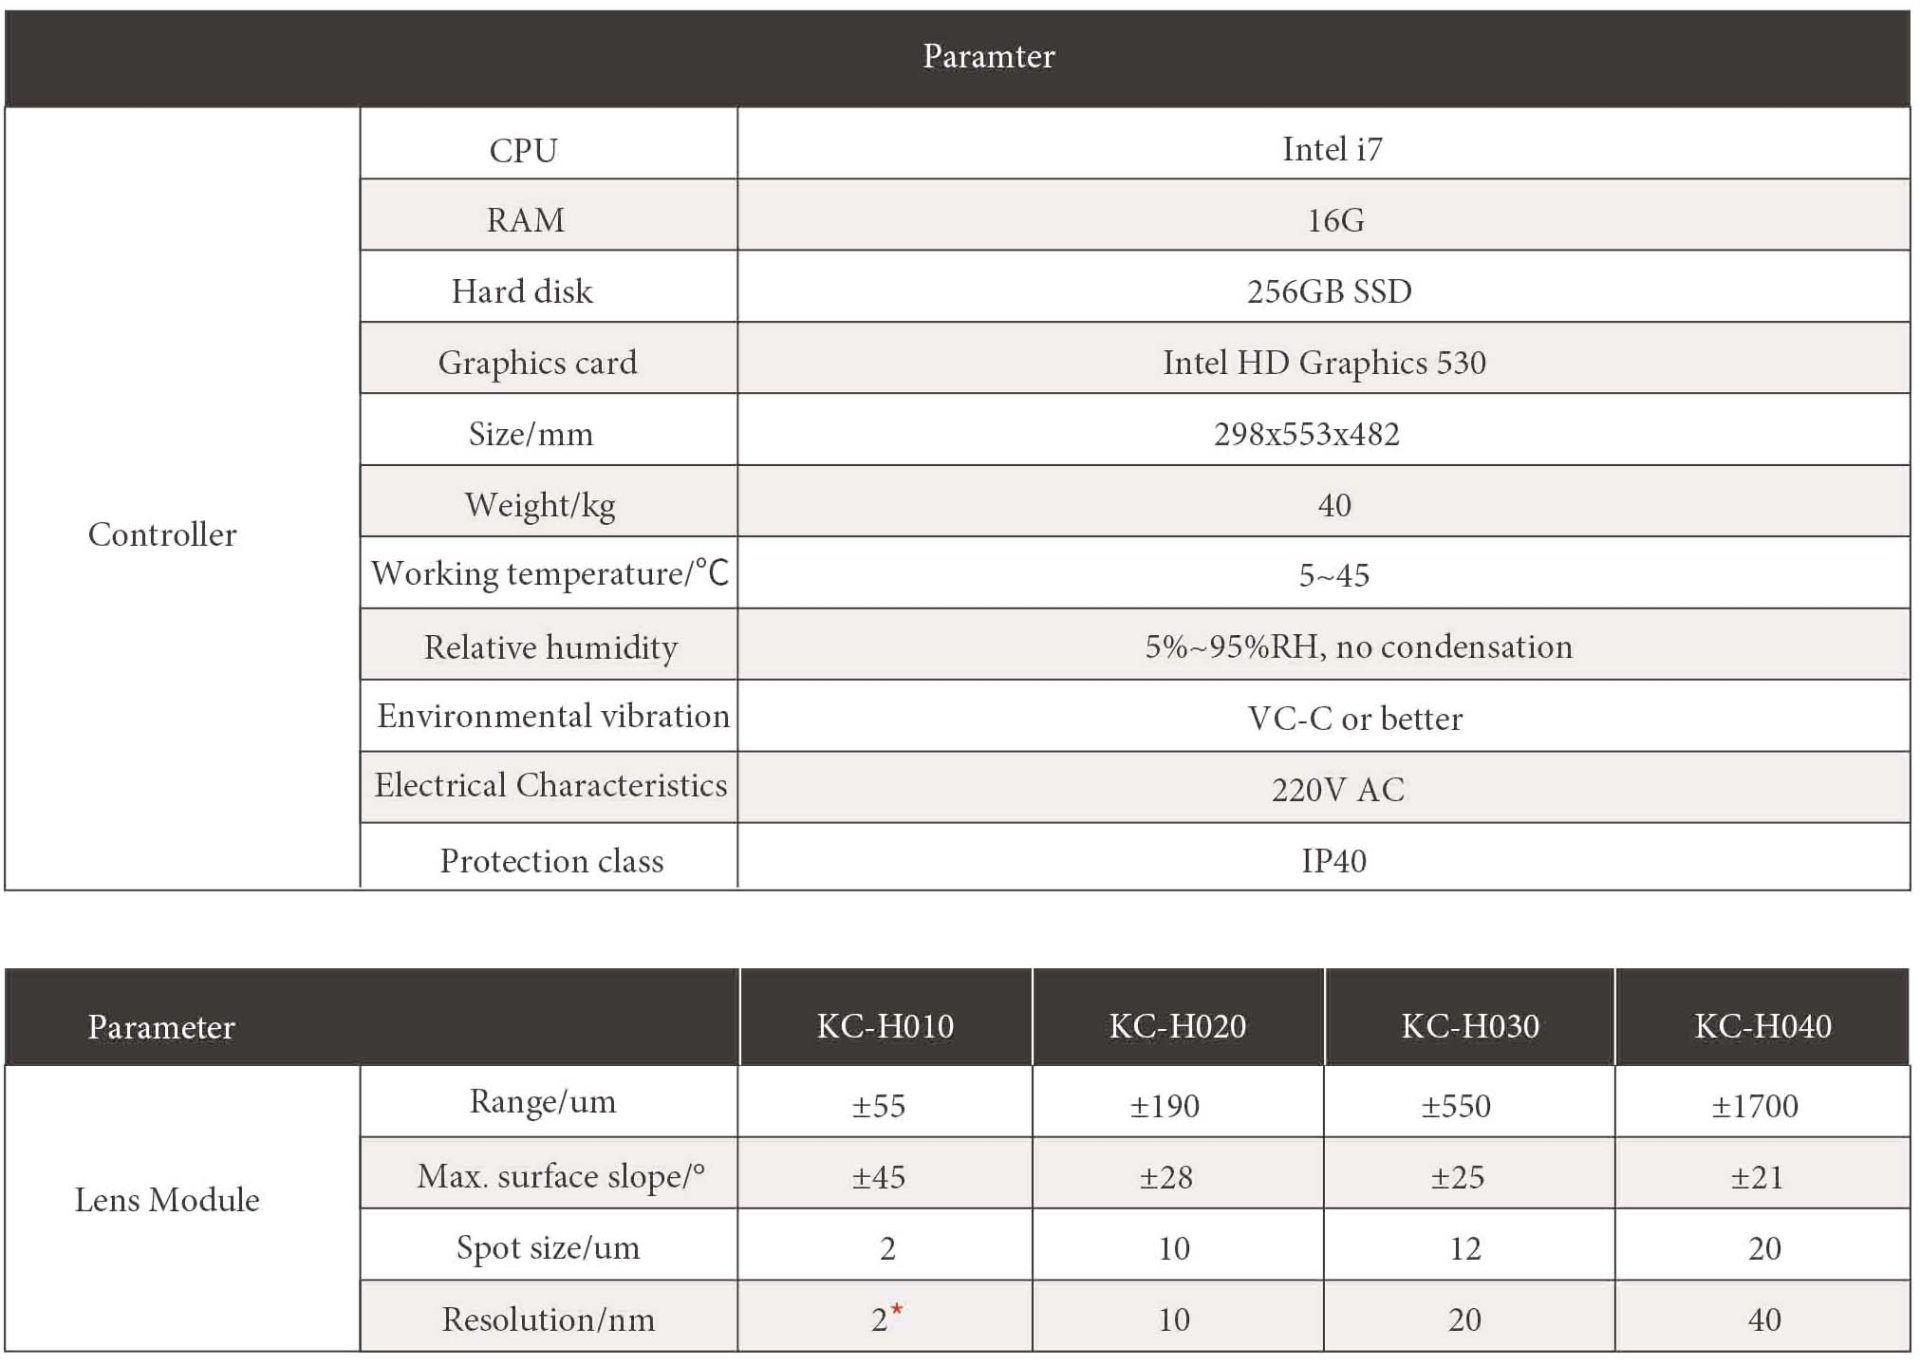
* The value refers to the value of the ICOE standard target (only for KC-H010) nano-step sample) in the laboratory standard measurement mode

Dimensions
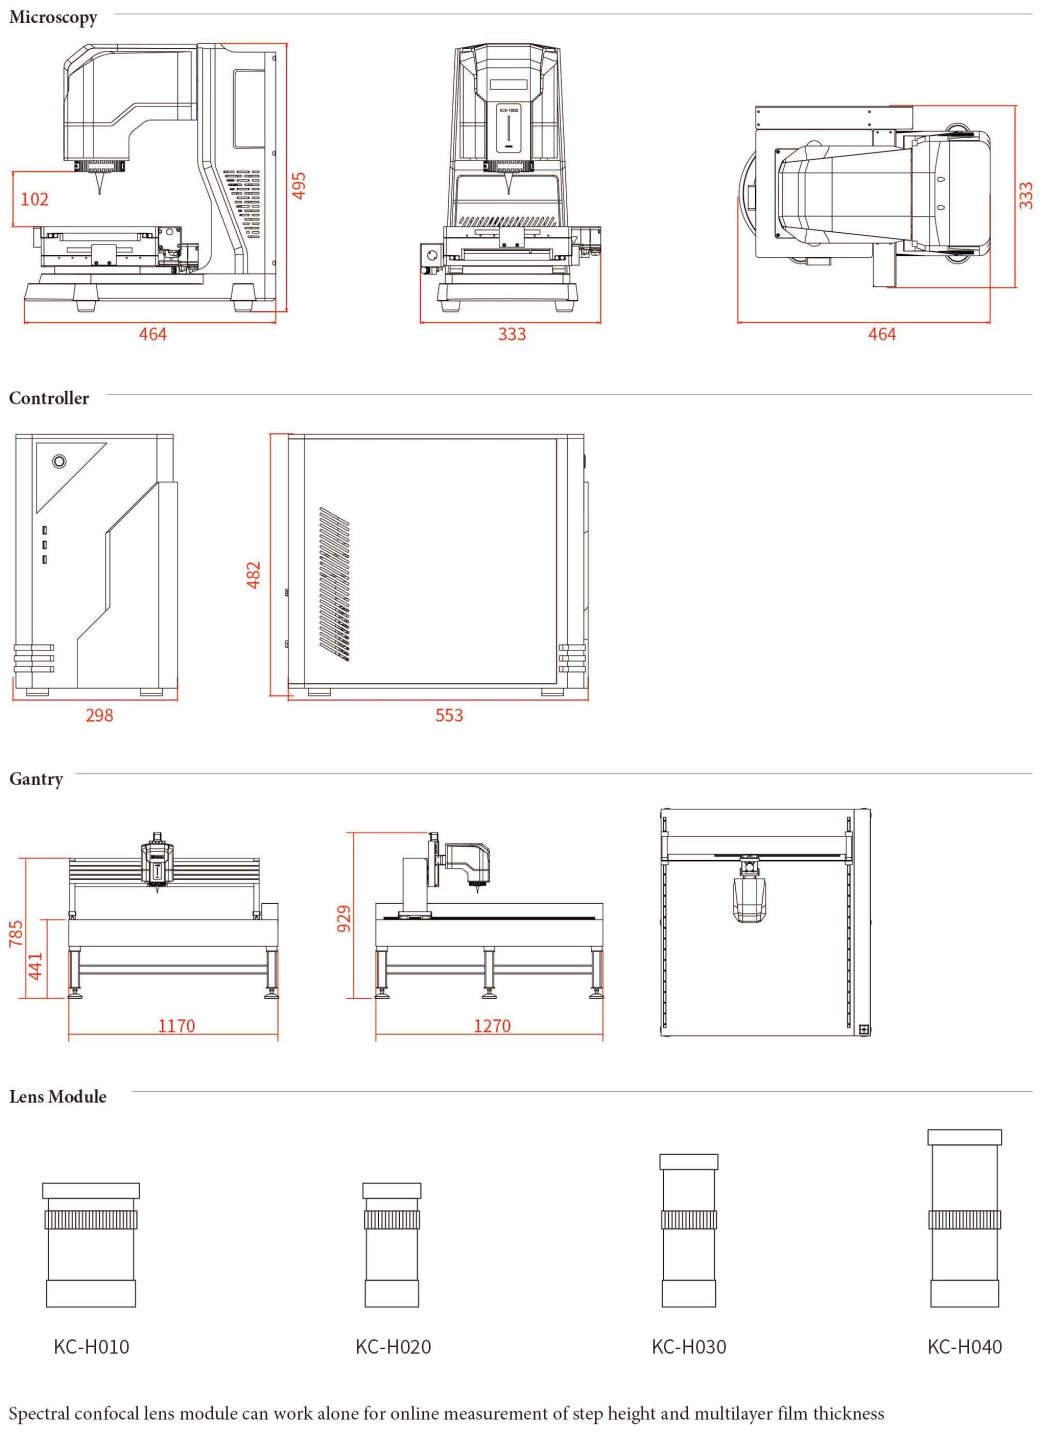
Appendix
| 2D/3D parameter detection standard
